How to Implement Google Tag Gateway
Part 2 of 6 in the series From pixel to server: tracking that holds
Contents
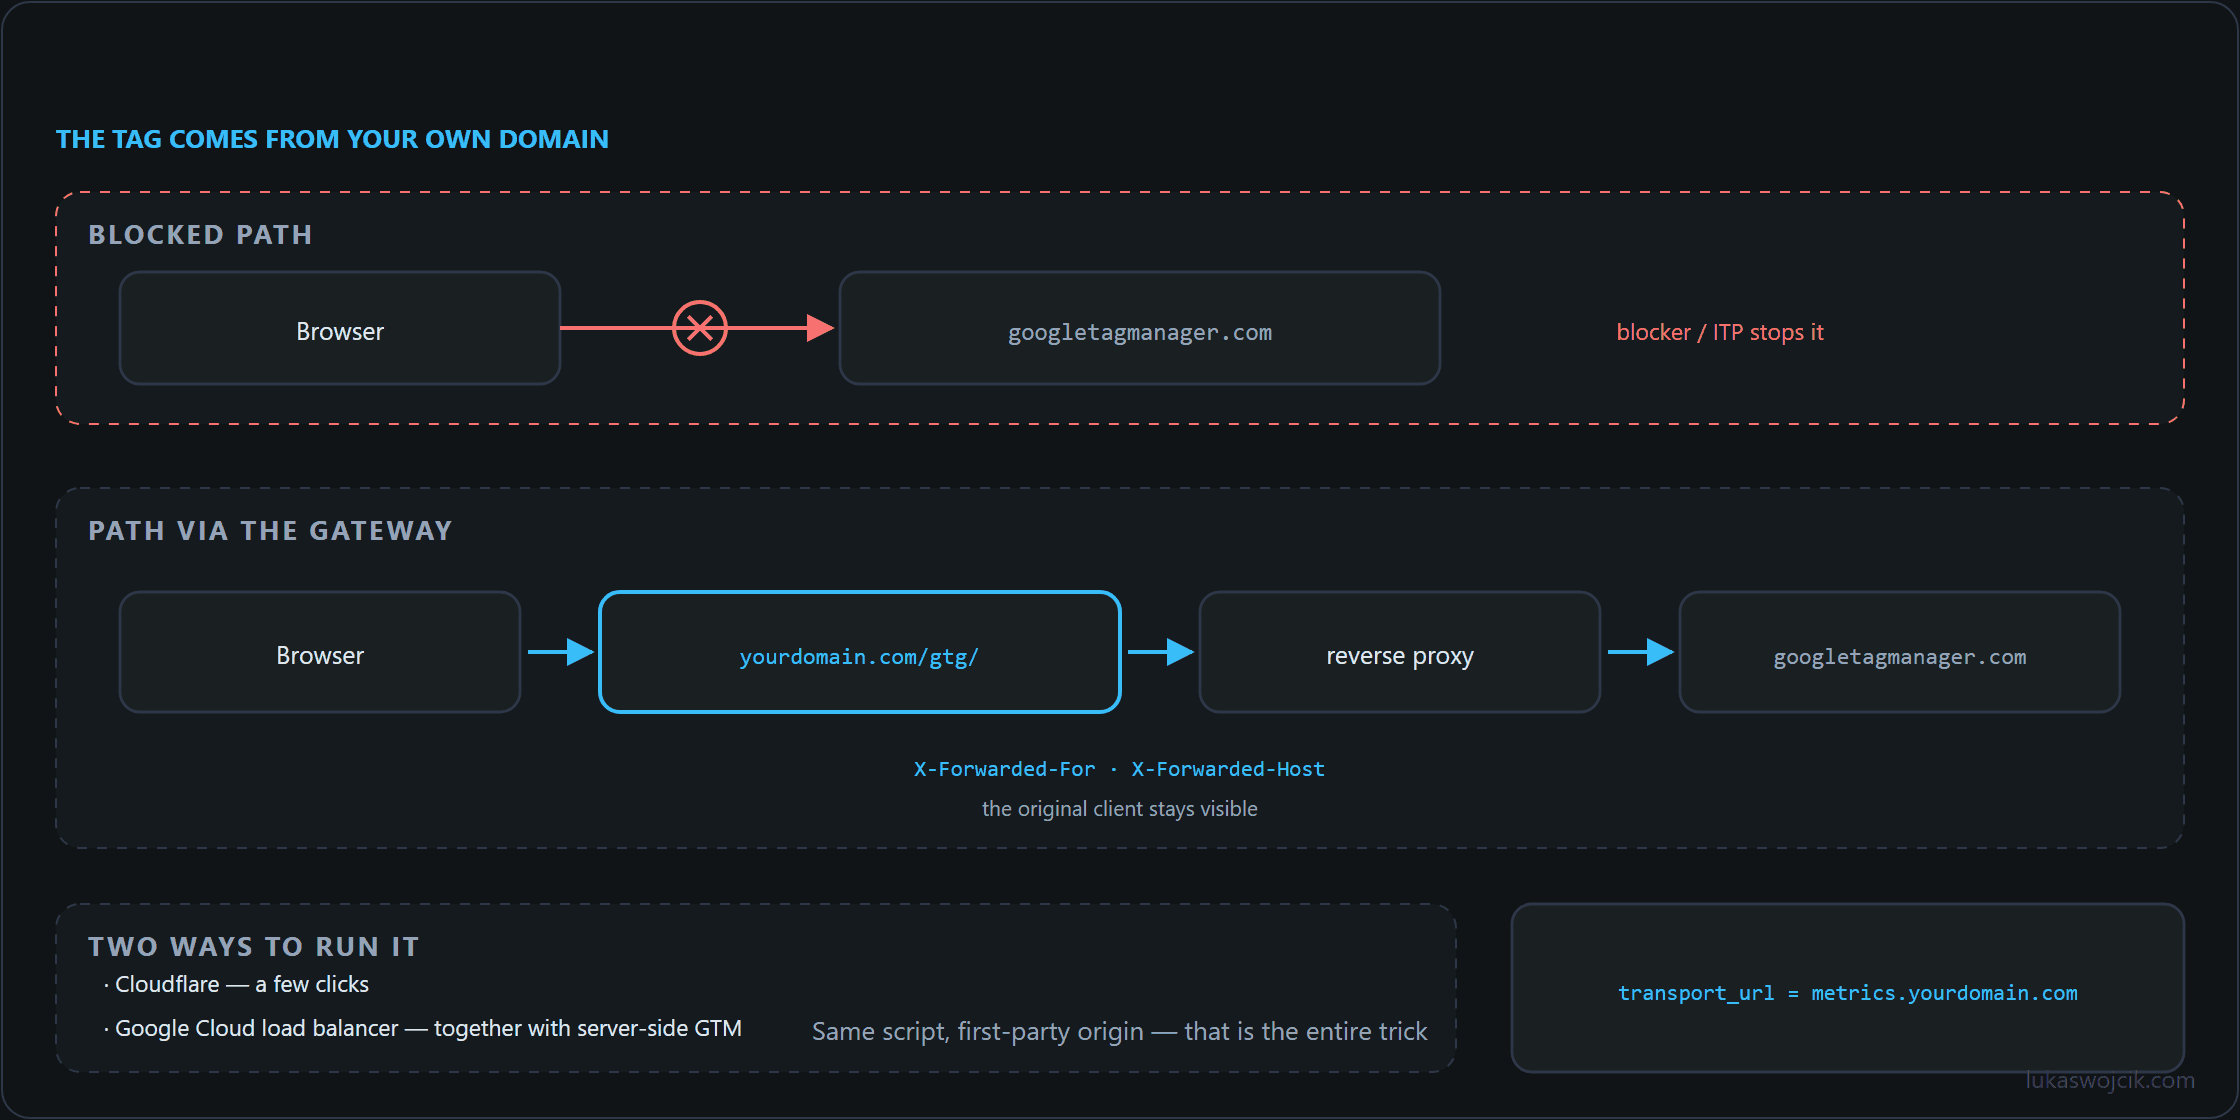
In an era of tightening privacy restrictions (such as ITP in Safari) and the growing popularity of ad blockers, maintaining high-quality analytical data is a significant challenge. The solution is the Google Tag Gateway (GTG). This involves routing analytical traffic through the site’s own domain (a first-party context), which allows for extending cookie lifespans and bypassing basic blockades.
How is this mechanism implemented? The architecture depends on the current setup.
Two Implementation Scenarios
The approach to Google Tag Gateway differs depending on whether Server-Side GTM is already in use or the implementation relies on the browser alone.
| Scenario | How it works | When to choose? |
| Client-Side GTM Only | Reverse Proxy directly tunnels requests to Google servers (e.g., downloads gtm.js and forwards Google Analytics hits). | To obtain first-party cookies quickly and bypass ad blockers without the costs of GTM server infrastructure. |
| Client-Side + Server-Side GTM | Browser traffic reaches the Server-Side GTM container via a Reverse Proxy, which processes the data before sending it to external tools. | For full control over data, IP masking, and integration with server-side conversion APIs. This is the recommended approach. |
Quick Deployment with Cloudflare
If the domain uses Cloudflare, creating a tag gateway is extremely simple using Cloudflare Workers.
- Create a new script in the Cloudflare Workers section.
- Configure the script to intercept traffic from a path (e.g.,
yourdomain.com/gtg/) and forward it to Google servers or the address of the Server-Side GTM container. - Set appropriate HTTP headers (especially
X-Forwarded-ForandX-Forwarded-Host) to maintain correct client IP addresses. - Attach the script to a specific path in the “Triggers” tab using routing rules.
Cloudflare will act as a lightning-fast Reverse Proxy operating at the edge of the network, ensuring minimal latency for users.
Webmaster-Side Changes (Reverse Proxy)
Launching the Gateway is only half the battle. The website must start using it. The webmaster or developer must make the following changes:
- GTM Script Update: Instead of loading GTM from
https://www.googletagmanager.com/gtm.js..., the code must point to the new path, e.g.,https://yourdomain.com/gtg/gtm.js.... - GA4 Transport URL Change: In the Google Analytics 4 (or Google Tag) configuration, the
transport_urlparameter must be overwritten so that hits are sent to the Reverse Proxy address. - CORS Verification: The webmaster must ensure that Cross-Origin Resource Sharing headers do not block requests sent to the new subdomain or path.
Load Balancer in Google Cloud for GTG + Server-Side GTM
For large e-commerce projects where traffic is counted in millions of sessions, a single entry point may not be enough. Implementing Server-Side GTM in the Google Cloud Platform environment (e.g., using Cloud Run) requires creating a professional Load Balancer (GCP HTTP/S Load Balancing).
- Configure a Serverless Network Endpoint Group (NEG) that connects the Load Balancer with the SS GTM container instances in Cloud Run.
- Reserve a global, static IP address in the GCP panel to assign it to the A record in the DNS system.
- Deploy a Google-managed SSL certificate on the Load Balancer to automatically manage HTTPS certificates for the analytical subdomain (e.g.,
metrics.yourdomain.com). - Create Routing Rules (URL map) that direct the relevant analytical traffic directly to the GTM servers.
Thanks to this architecture, the solution scales automatically with traffic volume (e.g., during Black Friday), guaranteeing full stability.
Sources
From pixel to server: tracking that holds
- The Evolution of Web Tracking: From Log Files to the Server-Side Future
- How to Implement Google Tag Gateway
- GA4 & Server-Side GTM: The “Migrate from JavaScript Managed Client ID” Feature Explained
- Server-Side GTM on GCP Cloud Run: Architecture, Auto-Scaling, and Cost Optimization
- GA4 Measurement Protocol: Server-Side CRM Offline Conversion Integration
- Meta Conversions API: Maximizing Event Match Quality (EMQ) and Deduplication
Related articles