English
 Deutsch
 Polski
Tutorial: Implementing Google Ads Enhanced Conversions

Contents
Enhanced conversions supplement Google Ads measurement with hashed customer data. A suitable match can enable additional advertising attribution. Complete recovery of missing conversions or a particular improvement is not guaranteed.
This example covers an email address at a confirmed website purchase. The purchase itself must be measured correctly independently of the enrichment. The setup requires suitable consent handling; hashing does not make an email address anonymous.
1. Prerequisites and the Google tag
Enhanced conversions must be enabled in Google Ads and the required customer data terms accepted. Google describes a unified setting for web and leads from April 2026. Older instructions requiring a choice between collection methods therefore do not match every interface.
The GTM container needs a Google tag with the correct Ads account as a destination. Collection is configured under Allow user-provided data capabilities. This example maps a variable explicitly; automatic scanning of the entire page is not required.
2. Supply data with the confirmed event
A data layer is a shared browser data structure. A dedicated event name makes the additional processing explicit. The example below only passes data to GTM and is not complete purchase tracking. Application code must reach this branch only after a confirmed purchase and permission for the processing; the snippet does not check consent.
window.dataLayer = window.dataLayer || [];
window.dataLayer.push({
  event: 'ads_purchase_ready',
  transaction_id: 'ORDER-123',
  customerData: { email: 'customer@example.com' }
});
GTM Data Layer Variables read customerData.email and transaction_id. A Custom Event trigger for ads_purchase_ready aligns execution with data availability. An existing purchase trigger must not send the same conversion again. The unique transaction ID belongs in the conversion event’s designated transaction field.
Alternatively, a DOM Element Variable can read the text of a stable element such as #customer-email. A visible element is not proof of a new purchase. On dynamic pages, an explicit event after data is ready is more reliable than visibility alone.
3. Map and hash customer data
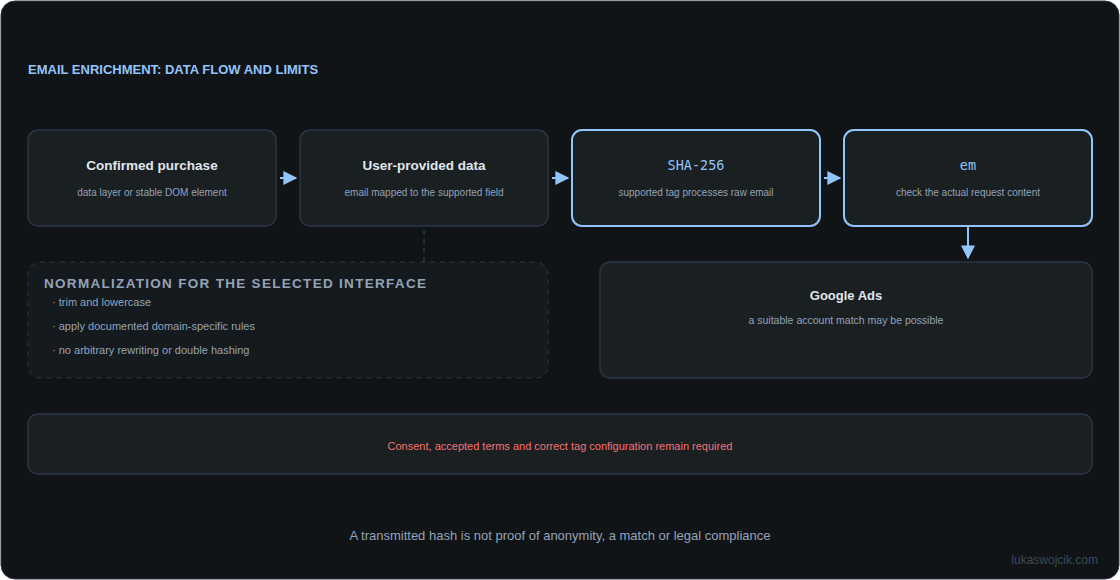
A User-Provided Data variable uses Manual configuration to map the email variable. Current Google guidance describes configuration through the Google tag or the user_data parameter; event-specific values can override tag-wide values. The older conversion-tag checkbox is no longer a universal menu path.
When an unhashed email is supplied, the supported Google tag performs the required processing before transmission. Prehashed values require the documented field intended for that format; hashing twice prevents a suitable match. Neither raw email nor its hash belongs in an ordinary GA4 event parameter forwarded indiscriminately from the data layer.
4. Validate before publishing
GTM Preview shows the event, available variables and consent state. With ad_user_data=denied, customer data must not be sent for advertising enrichment. Account switches, confirmation-page reloads and missing email addresses also need checks.
The network request’s em parameter can indicate enrichment data; an empty marker is insufficient. A hash in the request proves neither a successful account match nor a legally compliant overall setup. Google Ads conversion diagnostics provide an additional check, typically after about 48 hours.
Questions and answers
Which rules apply to prehashed CRM data?
The chosen interface’s rules are mandatory. Current Google Ads API documentation requires lowercase and removal of surrounding whitespace; gmail.com and googlemail.com also require removing dots and the plus suffix before the @. Other domains retain dots and plus suffixes. SHA-256 follows normalization. An arbitrary normalization rule can alter valid addresses.
Does Consent Mode protect data already in the data layer?
Google tag controls do not prevent other scripts from accessing data already present in the browser. Customer data should be supplied only for the intended purpose. Later events and account switches must not accidentally reuse stale values; clearing data and controlling access are part of the implementation.
What if the address appears after the tag fires?
Previously sent requests do not acquire later values. The event must align with data availability. For data available on an earlier page, Google also documents a dedicated user-provided data event tag; a second purchase event is not an appropriate substitute.
Related articles