English
 Deutsch
 Polski
Raspberry Pi 4 and 5: Booting From an SSD by Changing the Bootloader
Part 1 of 7 in the series Homelab on the Raspberry Pi

Contents
An SSD can improve storage performance and capacity on a Raspberry Pi 4 or 5. The benefit depends on the drive, adapter, power supply and workload. Good microSD cards remain suitable for many installations; SSDs are not immune to corruption after power loss.
USB SSD and PCIe NVMe are different boot paths
Both models support compatible USB storage. A Pi 5 can also use an NVMe SSD through a suitable PCIe adapter or HAT. The bootloader stays in the board’s EEPROM; the operating system resides on the selected drive. Moving to an SSD does not move that EEPROM bootloader onto the SSD.
Preparation
- A verified backup protects existing files and application data.
- Writing an operating-system image overwrites the selected drive. Model, capacity and target selection need checking before writing.
- The SSD needs a compatible adapter and sufficient stable power. In particular, Pi 5 USB peripheral power depends on the supply and configuration.
- A fresh Raspberry Pi OS installation is different from migrating an existing installation. Applications and data need reinstalling or restoration after a fresh image.
1. Current configuration and backup
A running Raspberry Pi OS installation can display the EEPROM settings without changing them:
rpi-eeprom-configThe output needs saving outside the drive about to be overwritten. An existing bootloader may already support the required drive; resetting the whole EEPROM is not a compulsory first step.
2. Required boot order
The supported configuration route is sudo raspi-config, followed by Advanced Options > Boot Order. Available labels depend on the model and software version. The alternative editor is sudo rpi-eeprom-config --edit; its messages describe whether the change is immediate or requires a reboot.
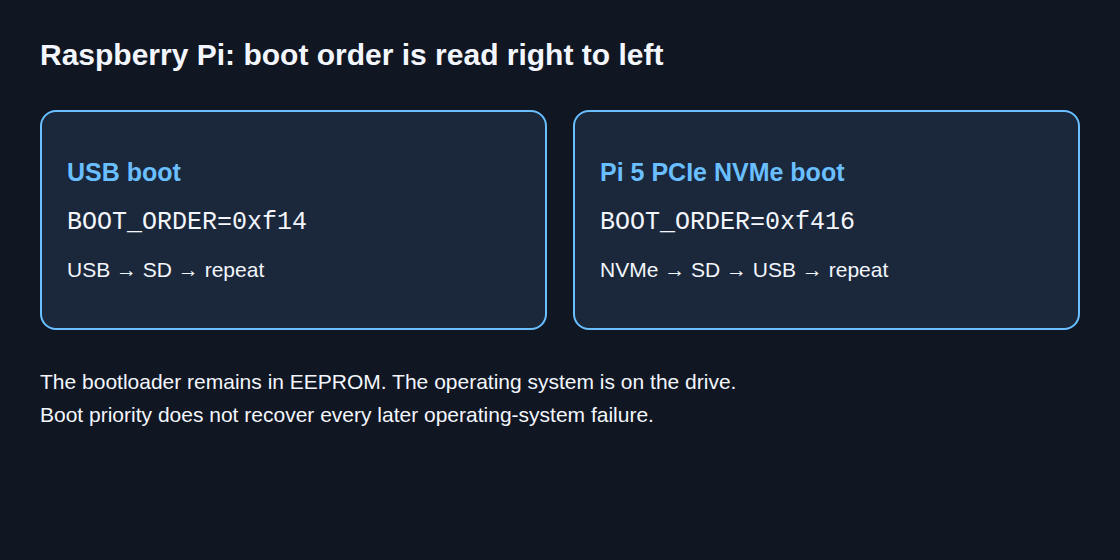
BOOT_ORDER is read from right to left. The digits mean 1 SD, 4 USB mass storage, 6 PCIe NVMe and f repeat. Thus 0xf14 tries USB then SD. For Pi 5, 0xf416 tries NVMe, then SD, then USB. A USB-connected NVMe enclosure still uses boot mode 4 (USB mass storage).
A non-HAT+ PCIe adapter may additionally require PCIE_PROBE=1 in EEPROM and dtparam=pciex1 in /boot/firmware/config.txt. The adapter documentation and the current Raspberry Pi instructions determine the required combination.
3. Operating-system installation and SSD test
In Raspberry Pi Imager, the selected model, compatible operating system and SSD must match. After writing and verification, the Pi is shut down before connecting the SSD to USB 3 or the appropriate Pi 5 PCIe adapter. PCIe cables are connected only while power is disconnected.
The first test can run with the SD card removed. After startup, these read-only commands show the root filesystem and storage devices:
findmnt /
lsblk -o NAME,SIZE,TYPE,MOUNTPOINTS
The result confirms which device actually provides the root filesystem. Boot-file location and root filesystem can differ in custom setups. A later controlled reboot with a rescue card checks the intended priority without assuming automatic recovery from every OS failure.
Recovery when the Pi no longer boots
Raspberry Pi Imager provides model-specific EEPROM recovery images under Misc utility images. A spare SD card is overwritten with the chosen recovery image. The powered-off Pi receives that card, then starts with stable power. A green HDMI screen and the documented ACT LED pattern indicate successful recovery; elapsed time alone does not.
After success, power is removed and the recovery card taken out. Recovery can restore defaults beyond boot order, so saved custom settings need comparison before normal operation. This is a recovery option, not a required detour for every SSD installation.
Questions and answers
Does an SSD prevent power-loss corruption?
No. Interrupted writes can damage files or internal drive metadata. Power-loss protection varies by drive. Stable power, orderly shutdown, backups and, where appropriate, a UPS remain relevant.
Will the SD card rescue every failed SSD boot?
No. Boot order covers the bootloader’s attempts to load a bootable system. A kernel or application that fails later does not automatically trigger the next medium.
Will an SSD outlast dozens of SD cards?
No general ratio is justified. Endurance depends on the specific media, written data volume, temperature and workload. Performance and endurance specifications provide a better basis than the storage category alone.
Homelab on the Raspberry Pi
- Raspberry Pi 4 and 5: Booting From an SSD by Changing the Bootloader
- Raspberry Pi UPS: five options and selection criteria
- Local CI/CD for Raspberry Pi: Automating Docker Compose Deployments
- Docker Compose Home Server: Traefik, TLS and Update Monitoring
- Jellyfin on Raspberry Pi 5: Direct Play and Transcoding Limits
- Raspberry Pi as a Hardened WireGuard VPN Gateway with Split-Tunneling
- Raspberry Pi Monitoring with Prometheus and Grafana
Related articles