English
 Deutsch
 Polski
How to Set Up Rclone with Google Drive on a Headless Server (The Right Way)

Contents
Rclone can copy files from a server without a graphical interface to Google Drive. Authorization takes place once on a computer with a browser; the server then uses the saved configuration. A successful upload is still not a substitute for a restore test.
This guide sets up a dedicated OAuth client and a file-backup example that stops on errors. Requirements are a Google account with sufficient storage, SSH access, and Rclone on both computers. The example backs up a web directory, not a complete operating system or a running database.
Phase 1: Prepare a dedicated Google client
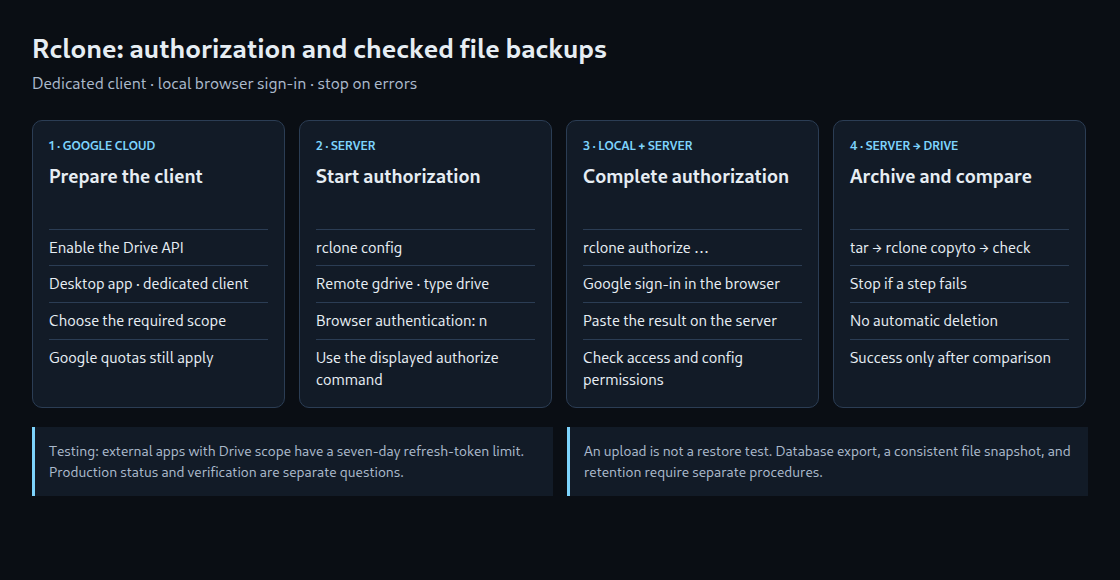
The current Rclone documentation announces retirement of the shared Google Drive client ID during 2026. A dedicated client ID avoids that dependency. Google quotas and throttling still apply; a separate project does not remove API limits.
- The setup requires a new or existing project in the Google Cloud Console with the Google Drive API enabled.
- Branding and Audience settings in Google Auth Platform define the application and its users. A normal personal Google account uses an external audience.
- The Drive scope defines the permitted access. This example uses
https://www.googleapis.com/auth/drive, which grants broad file access. Narrower scopes are available for different use cases. - The OAuth client type is Desktop app. Rclone configuration requires its client ID and client secret.
- For an external app in Testing, refresh tokens with this Drive scope expire after seven days. Continued operation requires the appropriate production status and a check of verification requirements. In production removes that particular testing limit, not every reason a token can expire.
Publishing and Google verification are separate steps. Personal-use exceptions can apply to verification. Warnings, user limits, and organizational policies still require separate consideration.
Phase 2: Start authorization on the server
Rclone must be installed on both computers. rclone version reports each version; the remote-setup documentation recommends the same version. Debian and Ubuntu provide a package through sudo apt install rclone. Prompt wording can differ between versions.
- On the server,
rclone configcreates a new remote namedgdrivewith storage typedrive. - The configuration requires the dedicated client ID, client secret, and intended scope. This flow does not use a service account.
- The answer to browser-based automatic authentication is
n. Rclone displays the appropriaterclone authorizecommand for the local computer and waits atconfig_token.
Phase 3: Sign in through the local browser
The authorization command displayed by the server runs on the computer with a browser. After Google sign-in and consent, rclone authorize provides a result to copy. That result belongs in the waiting server prompt; confirmation then completes the remote configuration. A normal local rclone config session is not the same as this token-output step.
rclone lsd gdrive: checks folder access. An empty Drive can produce an empty listing; the exit status and error messages also matter. rclone config file shows the configuration location. The file contains credentials and must remain readable and writable by the backup account while being protected from other accounts.
Phase 4: Copy files and check the run
The following script requires Bash, GNU tar, flock, and Rclone. The source directory, backup directory, and remote require adjustment before use. The archive directory must remain outside the source directory. The same account needs access to both the source files and the Rclone configuration.
#!/bin/bash
set -euo pipefail
umask 077

SOURCE_DIR="/var/www/html"
BACKUP_DIR="$HOME/backups/www"
REMOTE="gdrive:ServerBackups"

mkdir -p -- "$BACKUP_DIR"
exec 9>"$BACKUP_DIR/.backup.lock"
flock -n 9 || { printf 'Backup already running\n' >&2; exit 1; }

NAME="www_$(date -u +%Y%m%dT%H%M%S%NZ).tar.gz"
ARCHIVE="$BACKUP_DIR/$NAME"
PART="$ARCHIVE.part"
trap 'rm -f -- "$PART"' EXIT

tar -czf "$PART" -C "$SOURCE_DIR" .
mv -- "$PART" "$ARCHIVE"
rclone copyto --immutable "$ARCHIVE" "$REMOTE/$NAME"
rclone check "$BACKUP_DIR" "$REMOTE" --include "/$NAME" --one-way

printf 'Archive uploaded and checked: %s\n' "$NAME"
The script first creates a temporary archive. Only successful completion of tar gives it the final name. The upload and rclone check must also succeed before the success message appears. The lock prevents simultaneous runs using the same backup directory. The comparison checks file properties or available checksums, not whether a restored website works.
A running website can change files during archiving. A suitable snapshot or coordinated backup window is therefore needed for a consistent state. A database needs its own consistent export; archiving /var/www/html does not automatically capture the running database.
After a manual trial, cron can launch the executable script using a fixed absolute path. Exit statuses and logs need an error-notification mechanism. Automatic deletion is deliberately absent: local and remote archives accumulate until a retention policy is configured. That policy should account for a minimum retained set, failed runs, available space, and demonstrated recoverability.
Questions and answers
Why does the upload not end with delete –min-age 7d?
An age-only rule can select every remaining backup after a long interruption. A failed upload must not trigger deletion of older copies. This example stops failed runs and leaves retention as a separate task requiring an explicit policy.
Can an existing Rclone configuration be transferred?
Secure transfer of an existing configuration file is a documented alternative for Google Drive. rclone config file shows the path on both computers. Existing remotes, file permissions, and token validity need checking before the transfer; an existing server configuration must not be blindly overwritten. Recovery credentials need to remain accessible independently of the backup they unlock.
When is the backup actually usable?
A restore test establishes whether files, database exports, permissions, and required configuration work together. An upload comparison alone does not establish that. Confidential data also requires a separate decision about encryption before upload, for example with Rclone Crypt.
Sources and review date
2026-10-24
Related articles