English
 Deutsch
 Polski
ESPHome and ESP32 in Practice: Building Cloud-Free Environmental Sensors
Part 2 of 6 in the series Home Assistant without the cloud

Contents
ESPHome and ESP32 in Practice: Building Cloud-Free Environmental Sensors
An ESP32 with an SCD40 can send CO₂, temperature and relative humidity readings directly to Home Assistant. ESPHome builds the firmware from a YAML configuration. A manufacturer cloud account is unnecessary for this data path. Measurement quality still depends on the sensor, enclosure and calibration; a local connection does not create laboratory accuracy.
1. Sensor choice and wiring
The SCD40 measures CO₂ using photoacoustic NDIR technology. The specified accuracy range is 400–2,000 ppm, not 5,000 ppm; values outside that range are not covered by the same accuracy specification. The SCD30 is a different optical NDIR module with a specified accuracy range of 400–10,000 ppm. Neither range should be confused with the digital output range.
A VOC index describes changes in a mixture of volatile organic compounds, not a direct CO₂ concentration. ESPHome can calculate a VOC index from an SGP40 through the sgp4x component. The basic BME680 component exposes gas resistance; an air-quality index requires additional processing, for example BSEC. An SHT40 measures temperature and humidity. These optional modules require separate configuration and are absent from the example below.
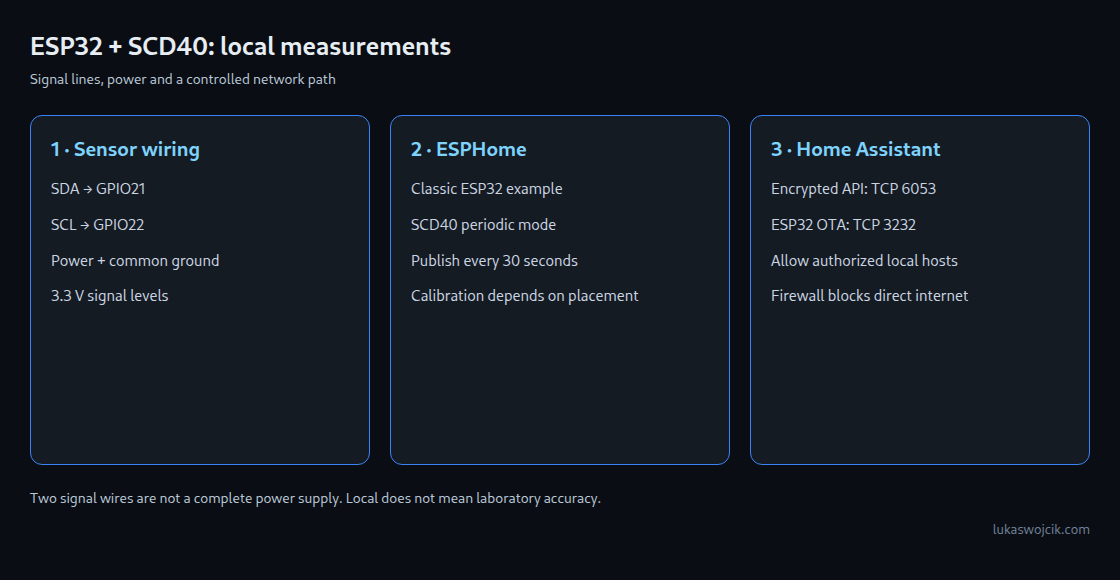
I²C needs SDA and SCL plus a common ground and a suitable power supply: two signal wires do not power the complete device. The example uses GPIO21 and GPIO22 on a classic ESP32 board represented by esp32dev. Other boards, especially C3/S3 variants, need matching board settings and pin assignments. The sensor breakout documentation determines the supply voltage, pull-ups and wiring. ESP32 signal lines require 3.3 V levels; a 5 V breakout supply does not justify 5 V pull-ups on SDA/SCL. Short wiring and suitable combined pull-up resistance help avoid bus overload.
2. Firmware configuration and validation
The following example covers an ESP32 and SCD40. Current ESPHome separates the esp32 block from esphome. Credentials belong in a private secrets.yaml beside the configuration. api_encryption_key must encode 32 random bytes in Base64; a descriptive placeholder or shared example key is unsuitable. The OTA password is separate from the API key. The first installation normally uses USB; subsequent updates can use the local network.
esphome:
  name: env-monitor-office

esp32:
  board: esp32dev
  framework:
    type: esp-idf

logger:

wifi:
  ssid: !secret wifi_ssid
  password: !secret wifi_password

api:
  encryption:
    key: !secret api_encryption_key

ota:
  - platform: esphome
    password: !secret ota_password

i2c:
  sda: GPIO21
  scl: GPIO22
  scan: true
  frequency: 100kHz

sensor:
  - platform: scd4x
    co2:
      name: Office CO2
    temperature:
      name: Office Temperature
    humidity:
      name: Office Humidity
    measurement_mode: periodic
    update_interval: 30s
    automatic_self_calibration: false
The sensor takes a measurement every five seconds in periodic mode; this configuration publishes readings every 30 seconds. The physical response to changing room air is slower than the network transfer. A faster polling interval does not make a gas sensor respond instantaneously.
3. Calibration and placement
Automatic self-calibration is deliberately disabled in this example until the installation meets the manufacturer’s conditions. The SCD4x ASC assumption includes regular exposure to approximately 400 ppm air, at least weekly in the cited datasheet. An occupied room with permanently elevated CO₂ may not meet that assumption. Disabling ASC also does not prevent drift: a suitable reference and maintenance procedure remain necessary.
Forced recalibration requires a known, stable CO₂ reference and the manufacturer’s procedure, including at least three minutes of operation under stable conditions before the recalibration sequence. Outdoor air must not simply be assumed to equal exactly 400 ppm. A falling daily minimum alone does not prove calibration drift. Comparison with a reliable reference is needed.
The sensor needs distance from the ESP32 and voltage regulator, with airflow through the enclosure. Temperature comparison against a reference follows thermal equilibrium. ESPHome’s temperature_offset defaults to 4 °C for SCD4x and needs adjustment for the actual assembly. This compensation affects temperature and relative humidity; it does not calibrate CO₂. The temperature and humidity channels are useful room indicators, but enclosure heating can dominate the error.
4. Local access and network boundaries
A dedicated IoT VLAN with a firewall can block direct internet access from the sensor. Home Assistant must still reach the sensor on TCP 6053 for the encrypted native API; the authorized update host needs TCP 3232 for ESP32 OTA, plus return traffic for these connections. The example enables both API encryption and password-protected OTA.
mDNS discovery generally does not cross VLAN boundaries automatically. A DHCP reservation and manual IP-based integration provide a predictable alternative; name-based discovery requires an explicitly configured network solution. Firmware compilation happens on the build host, which may need internet access to download dependencies. The sensor does not need an internet connection for the local API and OTA functions shown here.
Firewall isolation limits direct external connections. Home Assistant exports, cloud integrations and backups can still move readings outside the network. Availability also depends on Wi-Fi, power, firmware and the automation host; local operation is not a guarantee of uninterrupted service.
Questions and answers
How can the configuration be checked before installation?
Before compilation, the ESPHome configuration validator checks the actual board configuration and private secrets file. A successful configuration check confirms the schema, not electrical compatibility or sensor accuracy. Installation checks cover the I²C address, logs, incoming values, update path and behavior during Wi-Fi or Home Assistant outages. Calibration requires a separate measurement comparison.
Does an unavailable sensor mean zero CO₂?
No. An unavailable reading or interrupted connection is missing information, not a concentration of zero. Automations need an explicit fault state and a check of the last successful measurement. An unchanged numerical value alone cannot distinguish stable room conditions from a stalled sensor.
Home Assistant without the cloud
- Zigbee2MQTT and ZHA: Planning a Reliable Zigbee Network
- ESPHome and ESP32 in Practice: Building Cloud-Free Environmental Sensors
- Presence Detection 2.0: mmWave Radars (LD2410/LD2450) in Lighting Automation
- Local Voice Control in Home Assistant with Whisper & Piper
- WireGuard & Tailscale DMZ: Secure External Access to Home Assistant and Self-Hosted Servers
- Local Energy Management: Integrating PV Inverters and Battery Storage via Modbus TCP
Related articles