English
 Deutsch
 Polski
How to Control Tuya Devices Locally in Home Assistant

Contents
- Prerequisites
- Step 1: Create a Tuya IoT Developer Account
- Step 2: Link the Mobile App to the Developer Project
- Step 3: Retrieve the API Credentials
- Step 4: Install LocalTuya via HACS
- Step 5: Configure LocalTuya in Home Assistant
- Step 6: Add and Map the Devices
- Bonus Step: Isolate the Devices (VLAN)
- Conclusion
- Questions and answers
- Sources
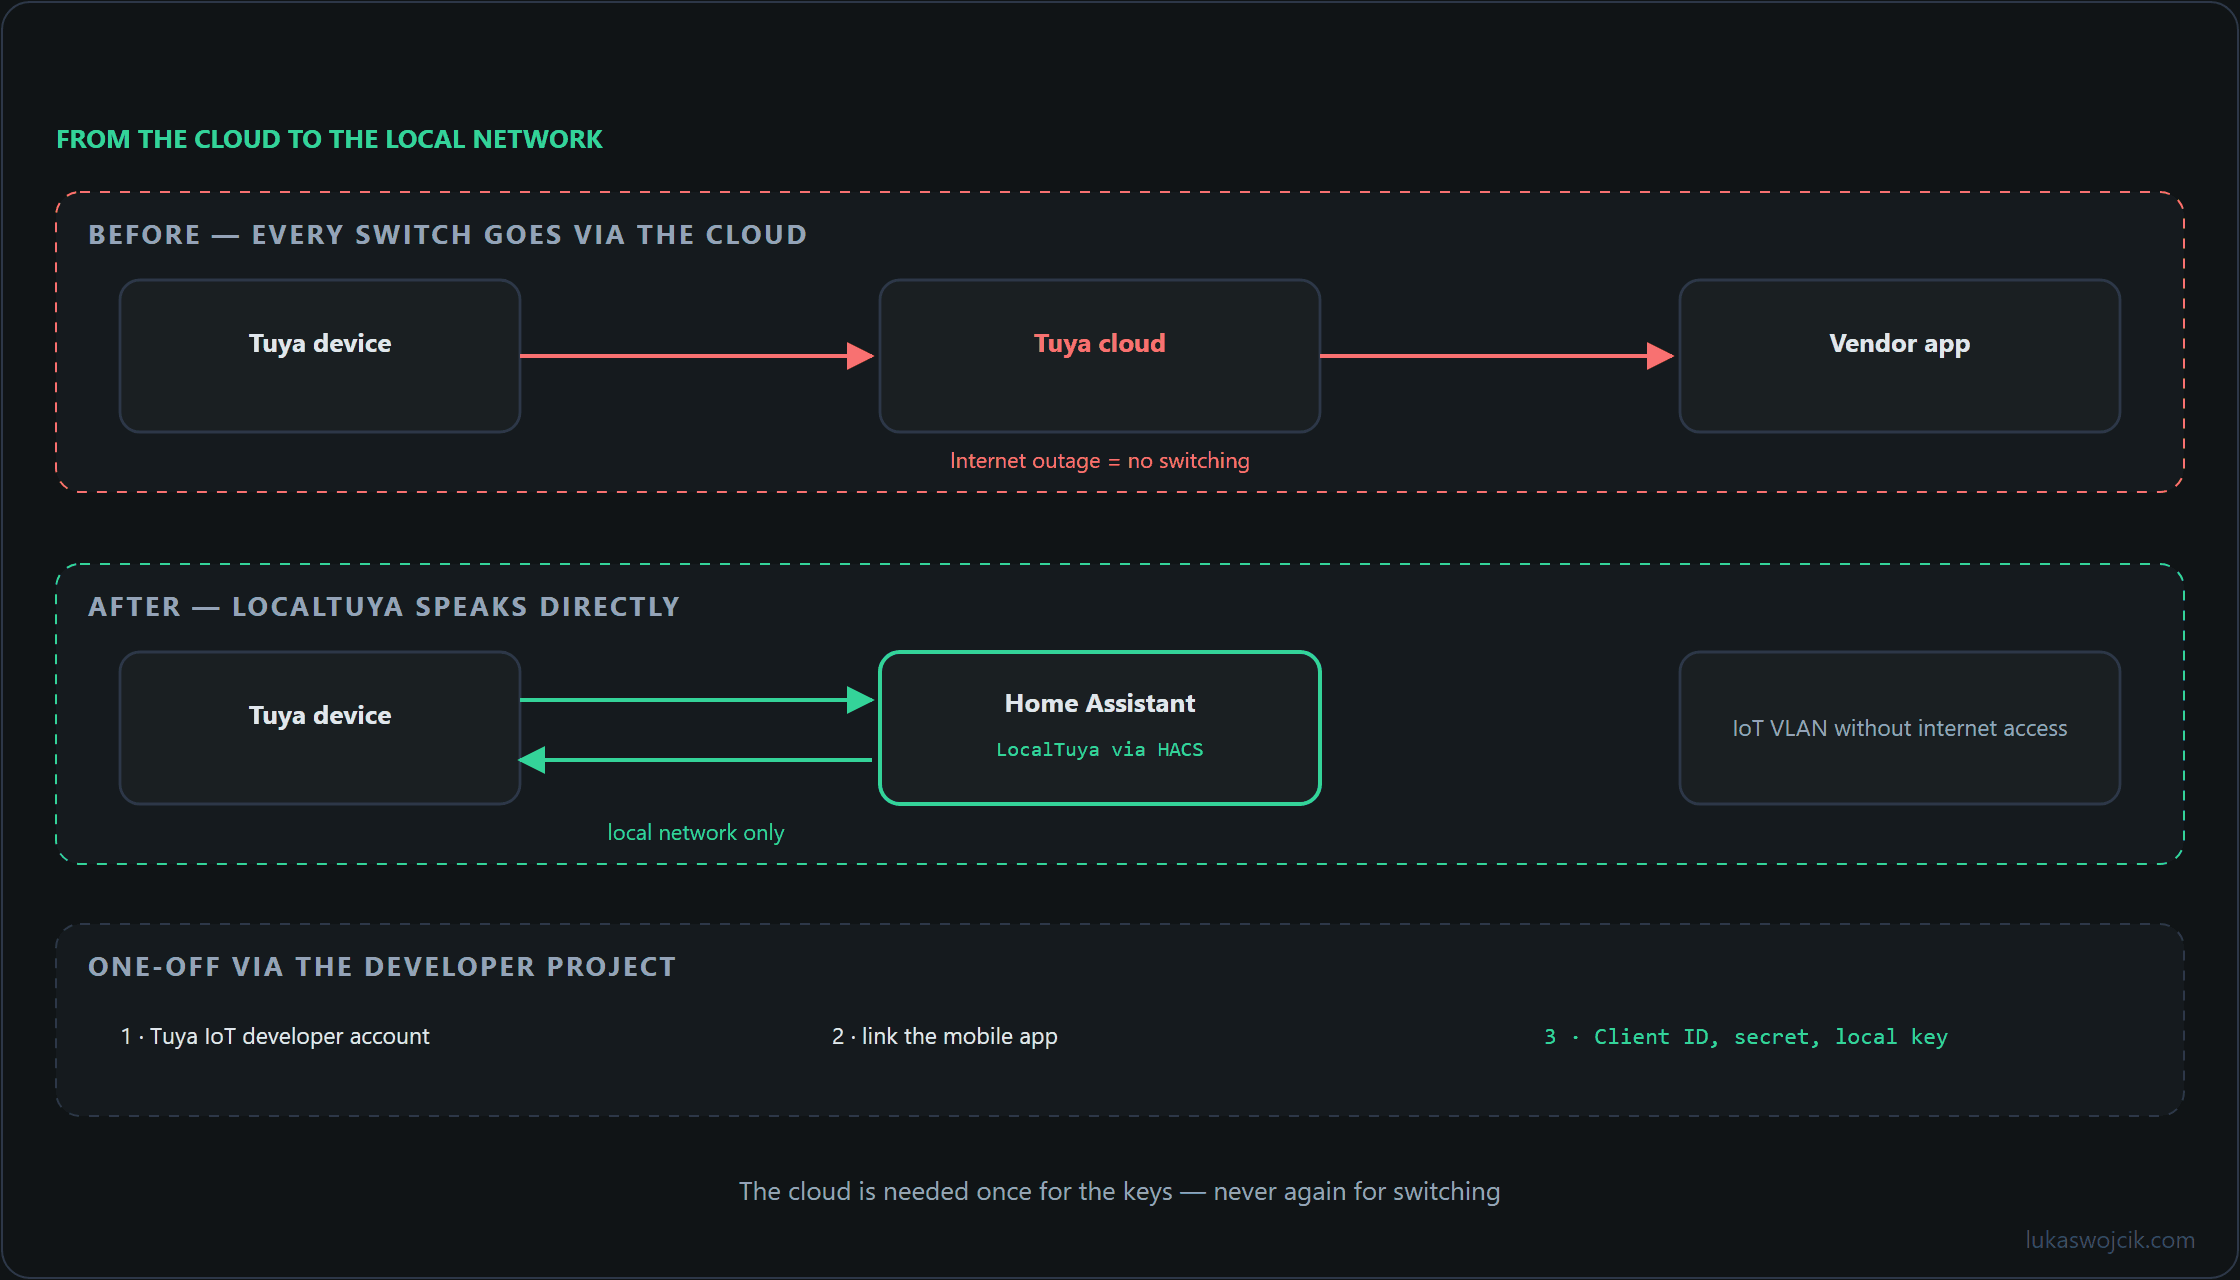
Anyone who has dabbled in smart home tech probably owns a Tuya-based device. They are affordable, ubiquitous, and available under hundreds of different brand names. However, they share one major flaw: a heavy reliance on the Tuya Cloud.
Relying on a cloud server means latency, potential downtimes, and privacy concerns. If the internet goes down, the smart home breaks. As digital architects advocating for robust and private systems, we need a better way.
In this guide, we will walk through migrating Tuya devices away from the cloud and integrating them locally into Home Assistant (running on a Raspberry Pi 4) using the LocalTuya integration.
Prerequisites
Before we begin, the following needs to be in place:
- A Raspberry Pi 4 (or any other machine) running a working instance of Home Assistant.
- Tuya devices currently connected to the Tuya Smart or Smart Life mobile app.
- HACS (Home Assistant Community Store) installed on the Home Assistant instance.
Step 1: Create a Tuya IoT Developer Account
To control Tuya devices locally, we need their unique “Local Keys.” To get these, we must register as a developer. Don’t worry—it is completely free.
- Navigate to the Tuya IoT Platform and create a free account.
- Once logged in, go to Cloud in the left sidebar and click Create Cloud Project.
- Fill in the details (Name: HA Local, Industry: Smart Home, Data Center: Choose the one closest to the installation site).
- The next screen asks for API authorization. Ensure that IoT Core, Authorization Token Management, and Smart Home Scene Linkage are selected. Click Authorize.
Step 2: Link the Mobile App to the Developer Project
Now the devices sitting in the mobile app need linking to this developer project.
- In the Tuya IoT Project, navigate to the Devices tab.
- Select Link Tuya App Account and click Add App Account.
- A QR code appears on screen.
- Open the Tuya Smart or Smart Life app on the phone, go to the “Me” tab, tap the scanner icon in the top right corner, and scan the QR code.
- Confirm the login. The devices now populate in the Tuya IoT platform.
Step 3: Retrieve the API Credentials
To automate the retrieval of the Local Keys, Home Assistant needs the project’s API credentials.
- In the Tuya IoT project, go to the Overview tab.
- The Authorization Key section holds the Access ID/Client ID and Access Secret/Client Secret.
- Copy both of these strings to a secure notepad; they are needed in a moment.
Step 4: Install LocalTuya via HACS
Now over to the Raspberry Pi 4 running Home Assistant.
- Open Home Assistant and navigate to HACS.
- Go to Integrations and click the Explore & Download Repositories button.
- Search for LocalTuya and install it.
- Once installed, restart the Home Assistant instance to apply the changes.
Step 5: Configure LocalTuya in Home Assistant
With the integration installed, it is time to bring the devices locally into Home Assistant.
- Go to Settings > Devices & Services in Home Assistant.
- Click Add Integration and search for LocalTuya.
- A prompt to configure the integration appears. Choose the option to configure it using the Tuya IoT API.
- Enter the Client ID and Client Secret (from Step 3), and select the user ID (usually available in the dropdown).
- Submit the form. LocalTuya will now communicate with the Tuya API one time to automatically pull the Local Keys for all devices.
Step 6: Add and Map the Devices
LocalTuya now discovers the devices on the local network.
- Select a discovered device from the dropdown list.
- Because Tuya devices are highly generic, the “Data Points” (DPs) have to be mapped by hand. For example, DP 1 is usually the main Power Switch, while DP 2 might be Brightness (for a bulb).
- Assign the correct entity type (e.g.,
switch,light,sensor) to the corresponding DP. - Click Submit. The device is now integrated into Home Assistant.
Bonus Step: Isolate the Devices (VLAN)
Home Assistant is now talking to the Tuya devices directly over the local network.
However, the devices themselves are still trying to phone home to the Tuya Cloud. To achieve true privacy and prevent unauthorized firmware updates, Network Separation is the remaining piece.
On a capable router (like Ubiquiti UniFi or pfSense), the Tuya devices get static IPs on an isolated IoT VLAN plus a firewall rule that blocks their outbound traffic to the WAN (Internet), while the Home Assistant Raspberry Pi keeps reaching them. Check out my previous article on Zone-based Firewall Rules to see exactly how to set this up!
Conclusion
Migrating away from the Tuya Cloud takes a bit of technical legwork, but the reward is a faster, more reliable, and completely private smart home infrastructure. Keeping the data processing local on the Raspberry Pi builds a resilient architecture that answers to its owner, not to a remote server.
Questions and answers
Does the local key of a Tuya device stay valid after a factory reset or re-pairing, once the VLAN blocks cloud access?
The key survives everything except a re-pairing. It belongs to the device as it is registered in the account, so a reboot, a power cut or a restart of Home Assistant leaves it untouched. A factory reset does not: the device registers again and receives a different key.
That makes re-pairing a small maintenance procedure rather than a spontaneous action: opening the outbound rule for that device, pairing it in the app, pulling the keys again through the developer project and closing the rule. Doing it in that order takes minutes; discovering it afterwards means a device that is visible on the network and refuses every command, which reads like a broken integration.
Firmware updates sit in the same category and deserve a deliberate decision rather than a surprise. They need the cloud too, so the block prevents them by design. That is the trade the isolation buys: no unannounced firmware, and no updates either. Where a device should receive them, the honest form is a scheduled window, not a permanent exception that quietly undoes the isolation.
Related articles