Tutorial: Setting Up LD2450 Radar Zones in ESPHome and Home Assistant

Contents
A presence radar of the LD2450 kind does something a motion detector never could: it says where. Up to three targets, each with an x and a y coordinate in millimetres, updated several times a second.
That turns the interesting question into a geometric one. A zone is four numbers – two on each axis – and everything that makes such a setup useful or maddening happens in how those four numbers are arrived at.
What the Sensor Actually Reports
The LD2450 is a 24 GHz radar that tracks up to three targets at once. Per target it delivers three numbers: an x coordinate, a y coordinate and a speed – the first two in millimetres, the last in centimetres per second, with a negative sign meaning movement towards the sensor.
This is where it differs from its smaller sibling. The LD2410 answers only whether something is there and roughly how far away, split into distance gates. It cannot separate a desk from a doorway, because it has no idea in which direction either lies.
Two properties are worth knowing before any mounting happens. The detection area is a wedge of about 120 degrees, so 60 degrees to each side of the front direction – anything outside it is invisible regardless of distance. And the useful range indoors is around six metres, with the accuracy of the coordinates falling off well before that.
Fixing the Origin Before Anything Else
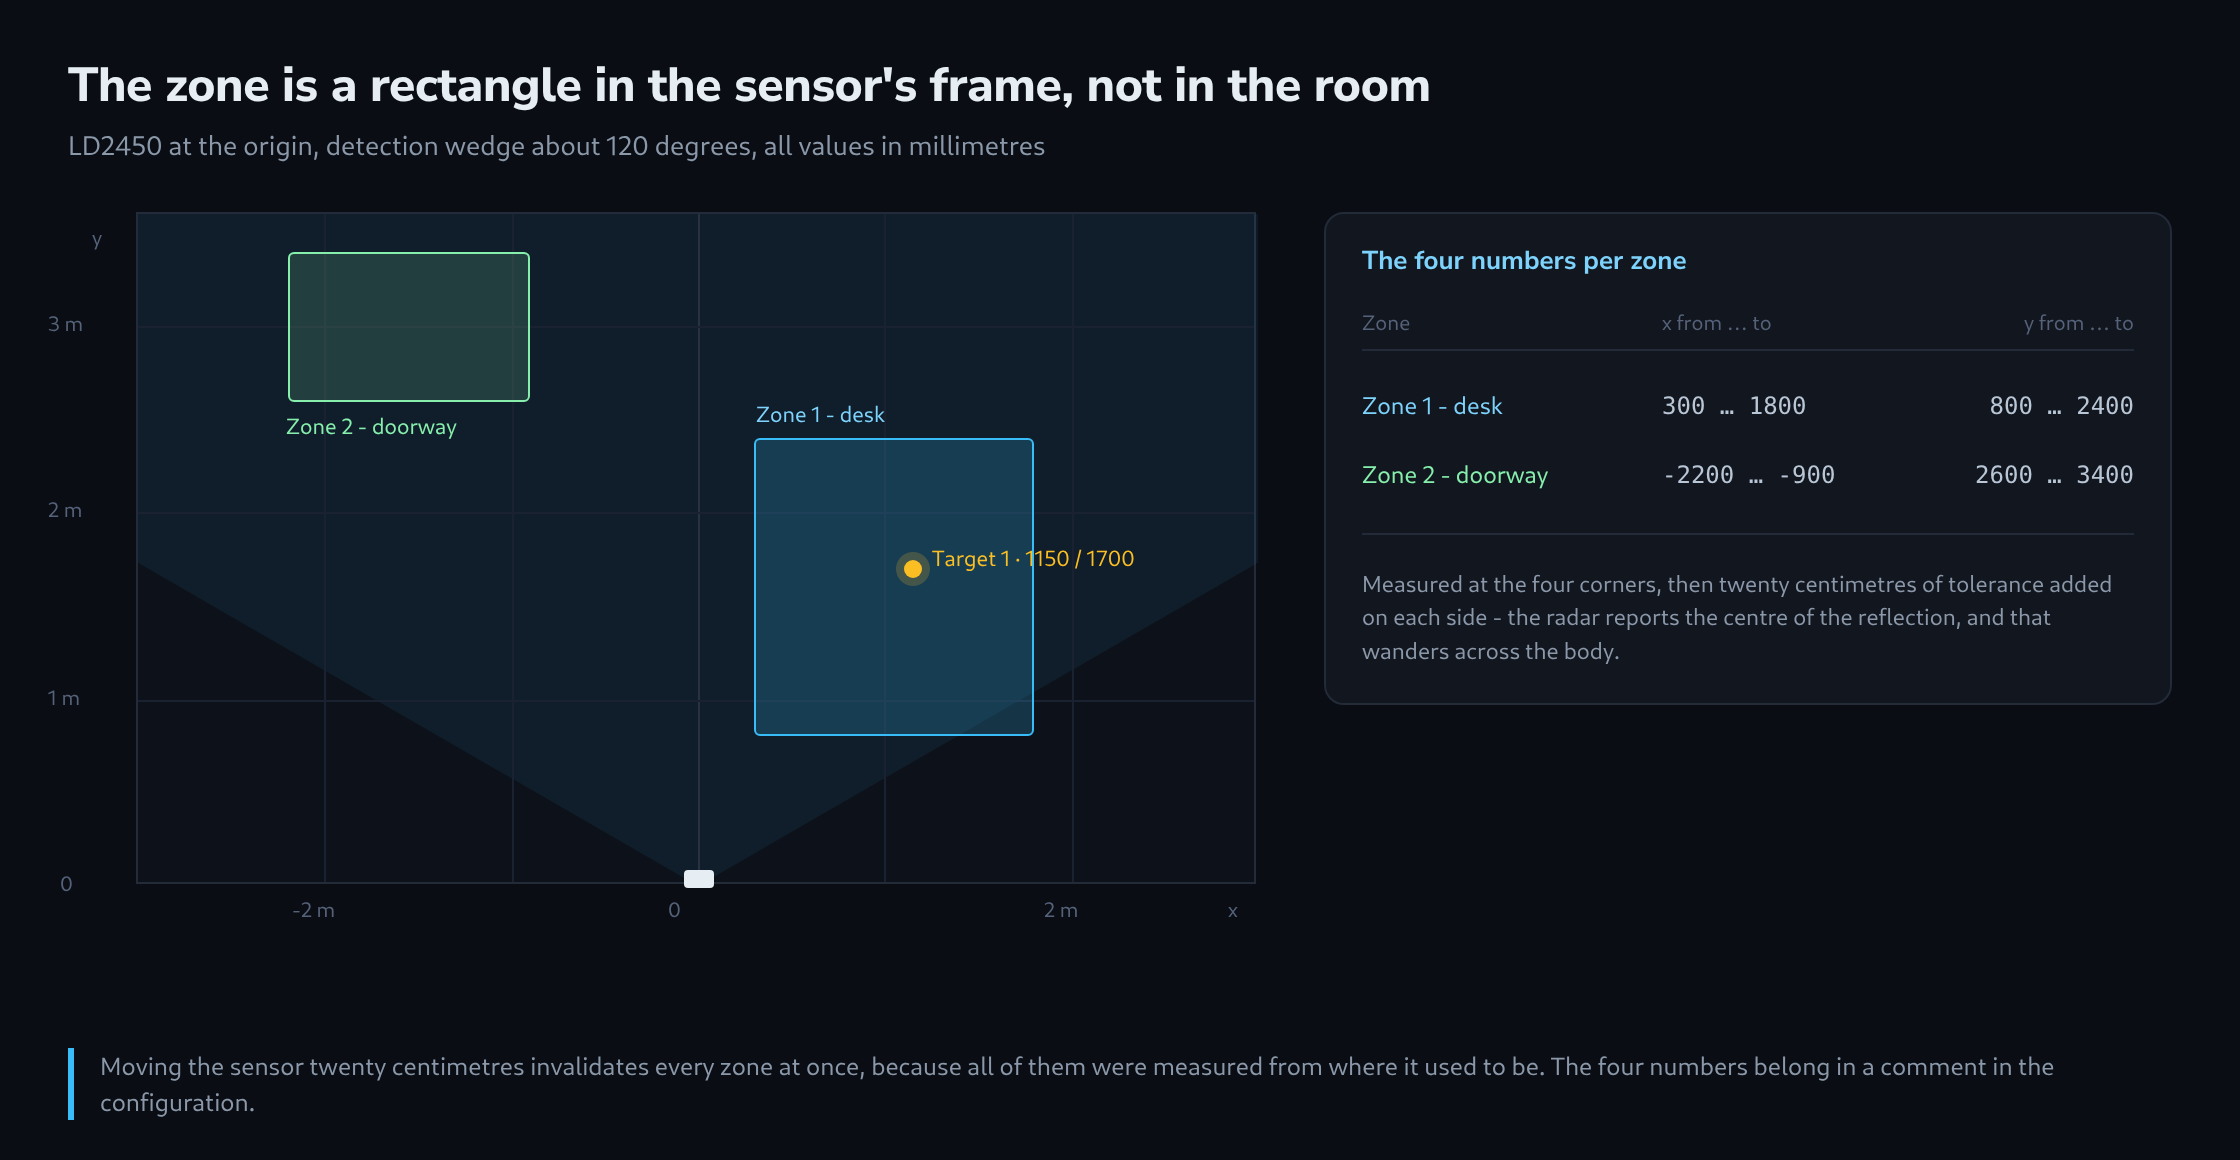
Every zone number refers to a coordinate frame whose origin is the sensor itself. The y axis points in the direction the board faces; the x axis runs across it, negative to the left, positive to the right, seen from behind the sensor.
Three consequences follow, and all three are cheaper to handle before the module is glued to a wall.
A sensor mounted rotated by ninety degrees swaps the axes, and every zone drawn on a floor plan has to be transposed. A sensor mounted upside down mirrors the x axis, so left and right change places and the zone lands on the other side of the room. And a sensor moved twenty centimetres to a nicer spot invalidates every zone at once, because all of them were measured from where it used to be.
The practical mounting position for an LD2450 is on a wall at roughly 1.2 to 1.5 metres – about waist height. Higher up, the radar looks down onto people rather than across at them, and the y coordinate then measures a diagonal rather than a distance along the floor. A ceiling position is a job for a different sensor.
The Configuration, and Where the Zone Lives
The ESPHome side is short. The radar speaks over a serial connection at 256 000 baud, and the component turns that into entities.
uart:
  id: uart_radar
  tx_pin: GPIO17
  rx_pin: GPIO16
  baud_rate: 256000
  parity: NONE
  stop_bits: 1

ld2450:
  id: radar
  uart_id: uart_radar
  throttle: 1000ms

binary_sensor:
  - platform: ld2450
    ld2450_id: radar
    has_target:
      name: "Presence"
    zone_1:
      occupancy:
        name: "Desk occupied"
    zone_2:
      occupancy:
        name: "Doorway occupied"

sensor:
  - platform: ld2450
    ld2450_id: radar
    target_1:
      x:
        name: "Target 1 X"
      y:
        name: "Target 1 Y"
      speed:
        name: "Target 1 speed"
    zone_1:
      target_count:
        name: "Targets at the desk"

number:
  - platform: ld2450
    ld2450_id: radar
    presence_timeout:
      name: "Presence timeout"
    zone_1:
      x_begin:
        name: "Zone 1 X begin"
      y_begin:
        name: "Zone 1 Y begin"
      x_end:
        name: "Zone 1 X end"
      y_end:
        name: "Zone 1 Y end"
The throttle is the setting most worth having. Without it the radar reports several times a second, and every one of those reports becomes a state change in Home Assistant. One second is plenty for lighting and keeps the database from growing by a megabyte a day per sensor.
Where the zone bounds live is the detail that surprises people. They are not values in the YAML – they are numbers stored in the radar module’s own flash, and ESPHome exposes them as number entities so they can be set once. That is convenient, because a zone can then be corrected from a phone while standing in the room. It is also a trap, because a replaced module comes back with the factory zones and nothing in the configuration says what they used to be. The four numbers per zone belong in a comment in the YAML, if only as documentation.
Measuring the Zone Instead of Guessing It
Zone bounds taken from a floor plan are wrong often enough that measuring is faster. The measurement needs one person, five minutes and the two coordinate sensors from the configuration above.
Standing at each corner of the intended zone and reading the x and y values gives the rectangle directly. Four corners, eight numbers, and the extremes of those are the bounds. A tolerance of about twenty centimetres on each side is worth adding, because a person is not a point: the radar reports the centre of the reflection, and that wanders across the body with every turn.
Corner measurements at the desk (x / y in mm)

  front left     380 /  840
  front right   1760 /  810
  back left      420 / 2310
  back right    1780 / 2360

Zone 1 with tolerance:  x  300 … 1800     y  800 … 2400
Two checks belong to the same session. Walking through the zone and out again should switch the occupancy sensor cleanly in both directions. And standing just outside the boundary should not – if it does, the zone is bigger than intended, or the reflection is coming from somewhere other than the person.
The second check is the one that finds the mounting mistakes. A metal cabinet, a radiator or a large mirror reflects the radar signal and produces a target that stands where nobody is. Such a phantom is recognisable by being perfectly still and never leaving; the fix is a different sensor angle, not a smaller zone.
The Automation, and the Part That Makes It Flicker
With a working zone, the automation itself is unremarkable – and would flicker without one line.
binary_sensor:
  - platform: ld2450
    ld2450_id: radar
    zone_1:
      occupancy:
        name: "Desk occupied"
        filters:
          - delayed_off: 20s
The delayed_off is the difference between a lamp that stays on while somebody works and one that switches off whenever the person leans back. A radar loses a still target more easily than a moving one, and twenty seconds of hold costs nothing while it removes the entire class of complaint.
Its counterpart is the presence timeout in the module itself, which decides how long the radar keeps reporting a target after the last detection. Both delays add up, so a five-second timeout plus a twenty-second filter means the light goes out twenty-five seconds after the desk is empty. Worth setting on purpose rather than by accident.
On the Home Assistant side, one rule saves a lot of debugging: an automation should react to the zone sensor, never to the raw coordinates. A trigger on a numeric x value fires on every jitter of the reported centre, and the same person sitting still can cross such a threshold dozens of times an hour.
What Still Goes Wrong Afterwards
Three effects account for most of the remaining trouble, and each has a different fix.
The first is movement that is not a person. A fan, a curtain in a draught, a hanging plant – all of them move, all of them reflect, and to the radar they look like a slow target. A zone that excludes them is the cleanest answer; where that is not possible, a minimum speed condition helps, because the artefacts rarely produce a consistent direction.
The second is the neighbouring room. Twenty-four gigahertz passes through plasterboard with little loss, and a zone laid against a wall therefore also covers the sofa behind it. The coordinates say nothing about walls, because the radar knows nothing about them. Only measuring finds this, and it is worth doing deliberately: someone walks around in the next room while the target count is watched.
The third is that a second radar in the same room disturbs the first. Two LD2450 modules on the same frequency and pointing at each other produce targets in both that belong to neither. Where two are needed, they should face away from each other, and the overlap of their wedges should stay small.
Related articles