Sidechain Compression in FL Studio 2026: Routing, Fruity Limiter, Fruity Compressor and Peak Controller Step by Step

Contents
- What ducking changes in peak and loudness
- Prerequisite: kick and bass on their own mixer tracks
- Creating the sidechain route
- Option 1: Fruity Limiter on the COMP tab
- Option 2: Fruity Compressor since version 25.2
- Option 3: Fruity Peak Controller for any control
- Ghost kick: ducking without an audible control signal
- Choosing the release by tempo
- When the ducking does not work
- Measuring after the mixdown
- Sources
In electronic music, kick and bass occupy the same frequency range, and they often hit at the same moment. When both coincide, their levels add up to a peak that a limiter at the end of the chain has to catch, and in the sub range the two instruments blur into one. Sidechain compression solves this by lowering the bass for the duration of every kick hit: controlled by the kick’s signal, not by its own.
FL Studio 2026 comes with three built-in ways to do it. Fruity Limiter has a sidechain input in its compressor section, Fruity Compressor has had one since version 25.2 of 21 November 2025, and Fruity Peak Controller turns the level of the kick into a control curve for any knob. The walkthrough follows Image-Line’s online manual as of FL Studio 2026.1.6.
What ducking changes in peak and loudness
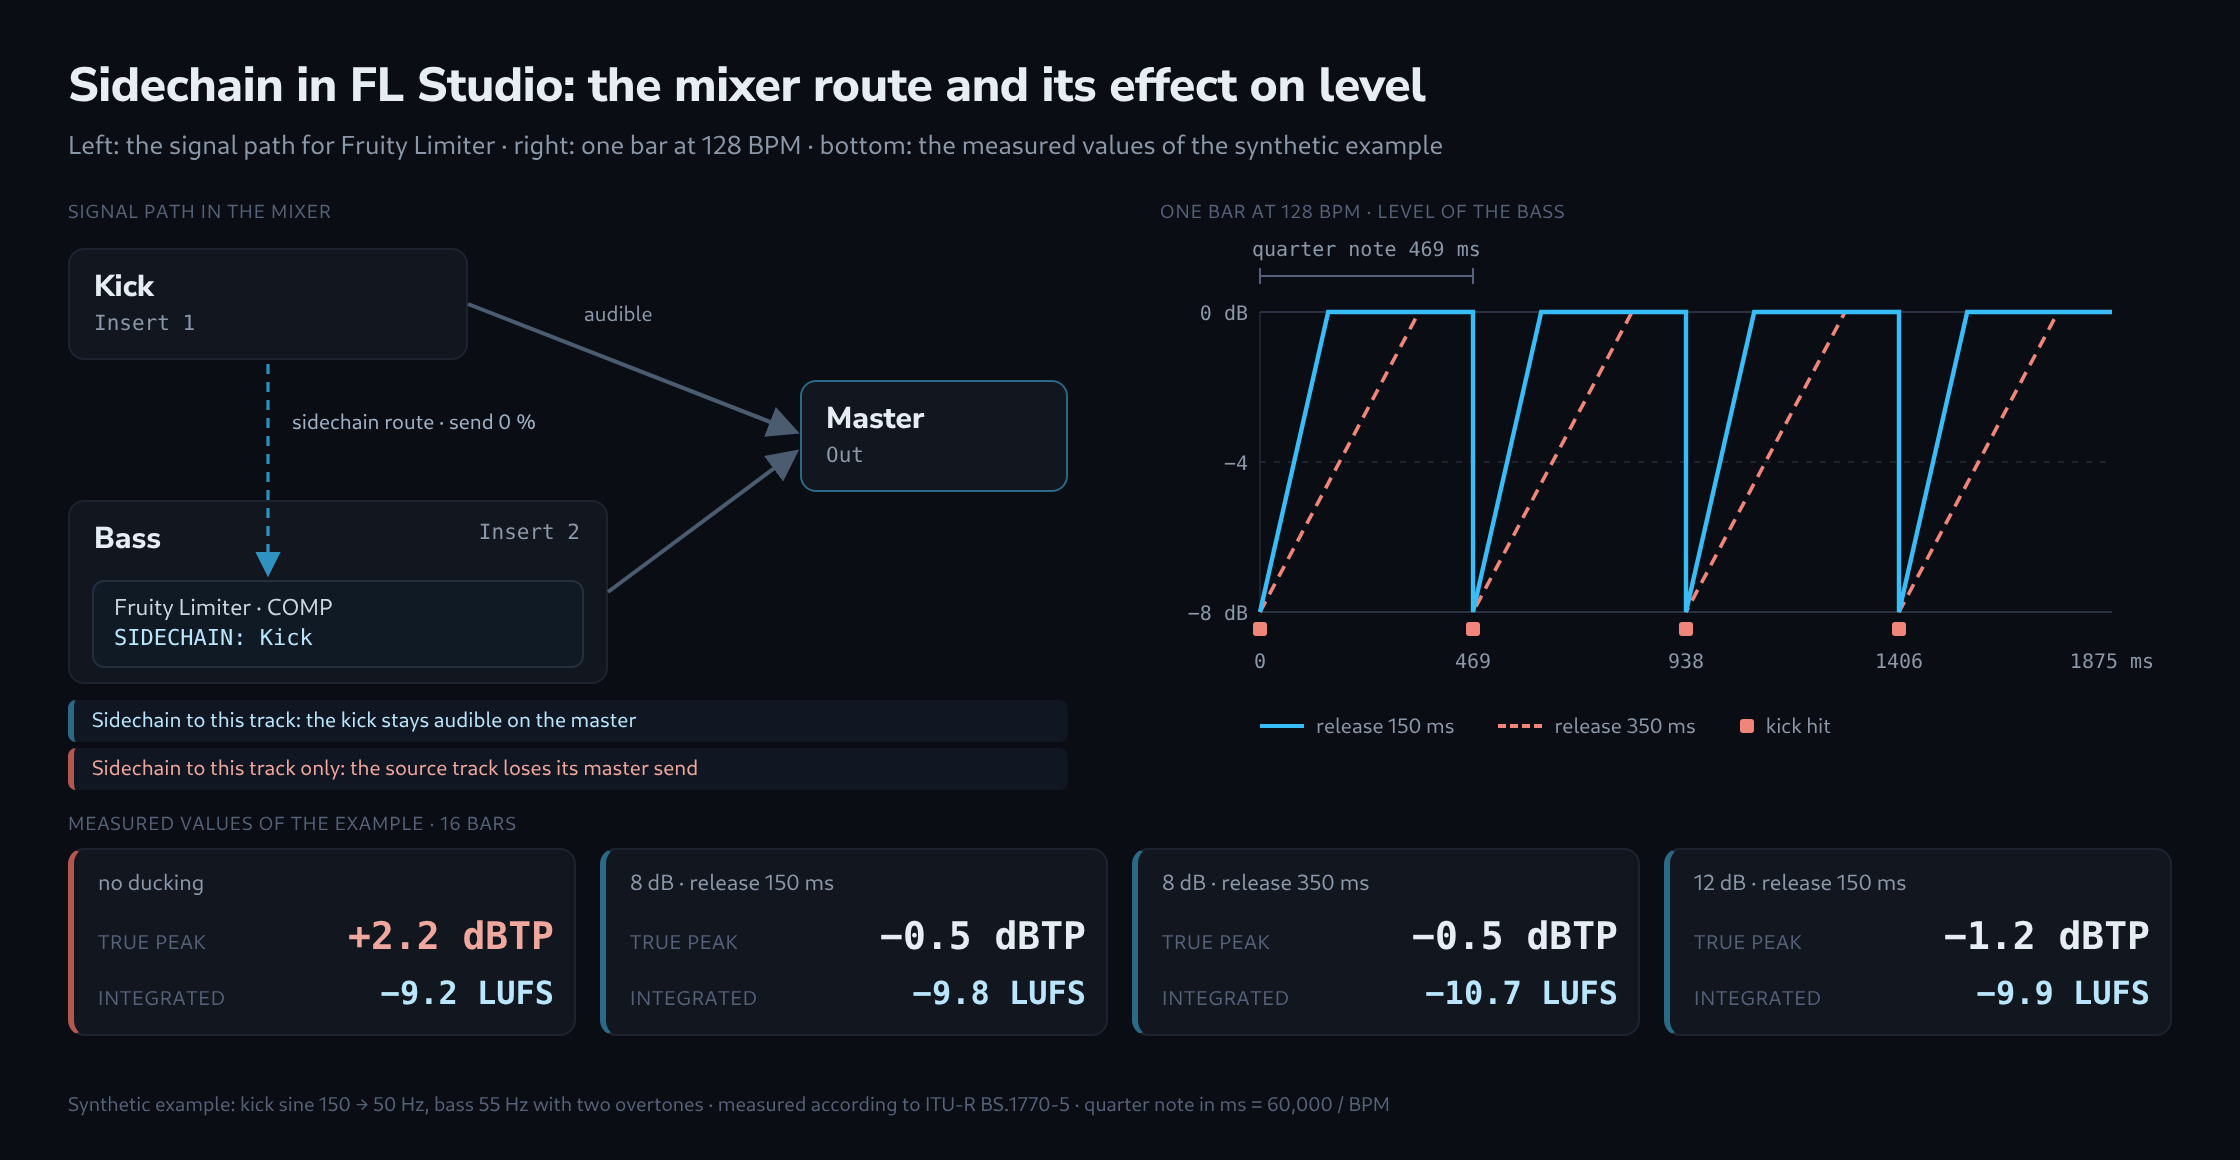
How much the ducking achieves can be measured. For this article, a synthetic example was built at 128 BPM over 16 bars: a kick made from a sine whose pitch falls from 150 to 50 Hz, and a continuous bass at 55 Hz with two overtones. The level curve drops the bass abruptly on every hit and brings it back linearly in dB, like a compressor with a very short attack. The measurement was taken with this site’s LUFS and True Peak Meter, which calculates according to ITU-R BS.1770-5.
| Variant | True peak | Integrated loudness | Peak to loudness ratio (PLR) |
|---|---|---|---|
| no ducking | +2.2 dBTP | −9.2 LUFS | 11.4 dB |
| 8 dB reduction, release 150 ms | −0.5 dBTP | −9.8 LUFS | 9.4 dB |
| 8 dB reduction, release 350 ms | −0.5 dBTP | −10.7 LUFS | 10.3 dB |
| 12 dB reduction, release 150 ms | −1.2 dBTP | −9.9 LUFS | 8.7 dB |
Without ducking, the combined peak of kick and bass sits at +2.2 dBTP, above full scale. With an 8 dB reduction and a 150 ms release it falls to −0.5 dBTP, while integrated loudness drops by only 0.6 LU. Around 2 dB of headroom are freed without the track becoming noticeably quieter. A longer release of 350 ms does not lower the peak any further but costs 1.5 LU of loudness, because the bass then stays lowered for three quarters of every beat. The figures apply to this example and not to every mix; the direction, however, shows up in any material where kick and bass hit at the same time.
Prerequisite: kick and bass on their own mixer tracks
In FL Studio a sidechain always runs from one mixer track to another. Kick and bass therefore each need their own insert track. According to the manual, new instrument channels in the Channel Rack are routed to the master by default, recognisable by the display “—” in the channel’s routing field.
- In the Channel Rack, the kick channel is marked with its channel selector.
- A right-click on a free insert track in the mixer opens the context menu; Channel routing › Route selected channels to this track moves the channel there (shortcut Ctrl+L).
- The bass gets a second track in the same way. Clear track names such as “Kick” and “Bass” pay off later, because the plugins’ sidechain selector lists the tracks by name. A track is renamed with F2.
Creating the sidechain route
The route sends the kick’s signal to the bass track without it becoming audible there. The manual describes it as a send with a level of 0 per cent: on the destination track, the audio is only available to plugins with a sidechain input.
- In the mixer, the kick track is clicked and thereby selected.
- On the bass track, a right-click on the send switch at the bottom of the track opens the routing menu.
- The entry Sidechain to this track creates the route.
The new connection appears as a pale, low-contrast cable. The kick track stays connected to the master and therefore audible. That is exactly what distinguishes this entry from the variant Sidechain to this track only, which additionally switches off the kick track’s send to the master. Choosing that variant for an audible kick removes the kick from the mix. Conversely, any existing audio send becomes a pure sidechain route as soon as its send knob is set to 0.
Option 1: Fruity Limiter on the COMP tab
Fruity Limiter combines a compressor, a limiter and a gate in one plugin. For the sidechain, only the compressor section matters.
- Fruity Limiter goes into a free effects slot on the bass track; every mixer track has ten of them.
- The COMP tab shows the compressor controls.
- A right-click on the SIDECHAIN selector lists the available tracks, and “Kick” is selected there. From now on, the kick track controls the compressor’s envelope instead of the bass track’s own signal.
- THRESH has to drop below the peaks of the control signal and RATIO has to rise above 1:1, otherwise the compressor does not engage. With THRESH at its maximum of 0 dB, the compressor stage is switched off.
Four controls shape the envelope. ATT sets how quickly the reduction starts; a short value lets it begin with the kick’s transient. According to the manual, REL is the main influence on how the level returns, and too small a value can distort the sound. CURVE shapes attack and release together, from 1 for immediate to 8 for slow, and the manual recommends it for timing pumping effects. SUSTAIN sets over how many milliseconds between 0 and 1000 the input is averaged, because the compressor works with RMS levels and the limiter with peak levels.
The display helps while adjusting: in the plugin’s options, Show analysis & gain envelopes shows the envelopes, and the white line is the actual gain reduction. The limiter section of the same plugin works with a look-ahead delay that is tied to its attack and adds latency. According to the manual, the limiter section is effectively bypassed when CEIL is at its maximum and ATT at its minimum on the LIMIT tab.
Option 2: Fruity Compressor since version 25.2
According to Image-Line’s change log, Fruity Compressor received a sidechain input with version 25.2 of 21 November 2025. The mixer route stays the same; here the selector is called Sidechain Input and is likewise set to the kick track with a right-click. The manual lists fixed ranges for the controls:
| Control | Range | Role in ducking |
|---|---|---|
| Threshold | 0 to −60 dB | the kick level at which the reduction starts |
| Ratio | 0.4:1 to 30:1 | how strongly the level above the threshold is reduced |
| Attack | 0 to 400 ms | how quickly the full reduction is reached |
| Release | 1 to 4000 ms | how long the bass takes to return to its level |
| Gain | −30 to +30 dB | level compensation after compression |
| Type (Knee) | Hard, Medium, Vintage, Soft and one /R variant of each | transition at the threshold; the /R variants switch TCR on |
The Type control is where this option has its trap. The /R variants activate TCR (Transient Controlled Release), which continuously adjusts the release time to avoid fast level jumps. According to the manual, this reduces “pumping and breathing”, which is exactly the effect ducking is meant to create. For audible pumping, a variant without /R is the right choice. According to the manual, Vintage emulates the curve of analogue units such as the Teletronix LA-2A.
Option 3: Fruity Peak Controller for any control
Fruity Peak Controller turns the level of a signal into a control curve. It can lower the bass volume, but it can also drive any control that accepts a link, such as the faders of several tracks or the cutoff of a filter. This option needs no sidechain route, because the connection runs through a controller link.
- Fruity Peak Controller goes on the kick track, because that is where the controlling signal lives.
- The MUTE switch in the lower right corner of the plugin is on by default and lets no audio through. The control curve is still generated, but the kick falls silent; for an audible kick, MUTE has to be switched off.
- At the target, for example the bass track’s volume fader, a right-click offers Link to controller. The internal controllers include Peak Ctrl – Peak, the pure level control without the LFO.
- A negative value for VOL, which ranges from −200 to +200 per cent, inverts the curve: the target drops with every hit instead of rising. BASE sets the resting value, DECAY the time it takes to return there and TENSION the shape of the curve.
The manual names a limit that is easy to overlook: the Peak Controller only evaluates input signals above −50 dB. The kick track’s fader plays no part in this, because in FL Studio it sits after the effects. What counts is the level at which the kick enters the track, for example via the channel volume in the Channel Rack.
Ghost kick: ducking without an audible control signal
Sometimes the bass is meant to pump where no kick is audible, for example in a breakdown, or the control signal should follow a different pattern than the audible kick. For this, a separate channel with a short kick sample gets its own mixer track, and the route to the bass track is created with Sidechain to this track only. Here the suffix “only” is exactly right: the track’s send to the master is switched off, the control signal stays inaudible and still drives the compressor.
Choosing the release by tempo
With a kick on every beat, the distance between two hits is one quarter note, which in milliseconds is 60,000 divided by the tempo. If the release ends well before the next hit, the bass returns to full level every time. The measurement above shows what an overly long release costs in loudness.
| Tempo | Quarter note | Eighth note | Sixteenth note |
|---|---|---|---|
| 90 BPM | 667 ms | 333 ms | 167 ms |
| 100 BPM | 600 ms | 300 ms | 150 ms |
| 120 BPM | 500 ms | 250 ms | 125 ms |
| 128 BPM | 469 ms | 234 ms | 117 ms |
| 140 BPM | 429 ms | 214 ms | 107 ms |
| 150 BPM | 400 ms | 200 ms | 100 ms |
| 174 BPM | 345 ms | 172 ms | 86 ms |
When the ducking does not work
| Observation | Cause | Fix |
|---|---|---|
| The sidechain selector offers no track | No sidechain route leads to the plugin’s track yet; according to the manual, tracks only appear after that, except on the master | Creating the route in the mixer |
| No audible ducking | THRESH is above the kick’s peaks, or RATIO is at 1:1 | Lowering the threshold, raising the ratio |
| The kick is missing after the setup | Route created with “only”, the kick track’s send to the master is off | Switching the master send back on or creating the route without “only” |
| Clicks or distortion | Release too short | A longer REL or Release |
| Fruity Compressor barely pumps | A /R type is selected, TCR smooths the release time | A variant without /R |
| The kick falls silent after loading the Peak Controller | MUTE is on by default | Switching MUTE off |
| The Peak Controller moves nothing | Input below −50 dB, VOL at 0 or link set to “Peak Ctrl – LFO” | A higher input level, a negative VOL, a link to “Peak Ctrl – Peak” |
Measuring after the mixdown
Ducking changes the peak and loudness of the whole track, as the example shows. Before mastering or uploading, a measurement of the export is therefore worthwhile: the LUFS and True Peak Meter reads WAV and AIFF files directly in the browser, shows integrated loudness, true peak and loudness range, and recalculates how Spotify would normalise the track. The file never leaves the device.
Which of the three options fits depends on the goal. Fruity Limiter and Fruity Compressor lower the bass as a genuine compressor and share the same route in the mixer; once the route is set up cleanly, switching between the two plugins requires no change to the routing. Fruity Peak Controller is the most flexible option because it drives any control instead of a compressor, but it takes more adjustment of base, depth and decay.
Related articles