Mastering to Streaming Loudness in FL Studio 2026: Parametric EQ 2, Maximus, Fruity Limiter and True Peak Step by Step

Contents
- Targets: −14 LUFS and a true peak below −1 dBTP
- Which stock tools show loudness and true peak
- Measurement: how far a limiter without oversampling overshoots its ceiling
- Step 1: Setting up the master chain
- Step 2: Setting up Fruity Limiter
- Step 2 with Maximus or Emphasis
- Step 3: Reading loudness and true peak in the Analyzer
- Step 4: Exporting
- Step 5: Measuring the export, encoded as well
- FL Cloud Mastering as an alternative
- Sources
A finished mix becomes a master once loudness, peak level and export format are right. For streaming services, that means an integrated loudness that fits the service’s target and a true peak with enough headroom below 0 dBTP, so that encoding to AAC, Ogg Vorbis or Opus does not cause clipping. FL Studio 2026 includes the tools needed: Fruity Parametric EQ 2 for corrections, Fruity Limiter in all editions and Maximus from Producer Edition upwards as limiters, and the Analyzer module in FL Studio Mobile Rack, which shows loudness in LUFS and true peak.
The tutorial follows Image-Line’s online manual as of FL Studio 2026.1.6. A measurement also shows how far a limiter without oversampling overshoots its ceiling and which ceiling masters between −14 and −8 LUFS need.
Targets: −14 LUFS and a true peak below −1 dBTP
Spotify recommends an integrated loudness of −14 LUFS and a true peak below −1 dB for masters. For masters louder than −14 LUFS, the help page recommends a true peak below −2 dB, because louder tracks are more susceptible to extra distortion when encoded. At the Normal level, Spotify turns louder masters down to −14 LUFS and raises quieter ones only as far as 1 dB of headroom remains for the lossy formats. Normalization also applies to FLAC playback.
AES TD1008 recommends −16 LUFS for music in streams with track normalization and −14 LUFS for the loudest track of an album with album normalization, plus no more than −1 dBTP at the codec input. With normalization switched on, a louder master therefore does not play louder, but it has less dynamic range and less headroom below 0 dBTP. How far AAC, MP3, Ogg Vorbis and Opus raise a master’s peaks is shown in the article True Peak After Encoding.
Which stock tools show loudness and true peak
FL Studio has no plugin called Loudness Meter. Three included tools show loudness in LUFS, and only one of them shows a true-peak reading:
| Tool | Editions | Readout |
|---|---|---|
| Analyzer in FL Studio Mobile Rack | all | LOUDNESS tab with the modes LUFS 0.4s (Momentary), LUFS 3s (Short-term), RMS, Peak and True Peak, plus the values Peak, Integrated and Range |
| Emphasizer | all | integrated loudness in LUFS |
| Emphasis | All Plugins Edition only | Momentary, Short-term and Integrated loudness, plus true-peak limiting |
| Wave Candy, Fruity dB Meter, mixer | all | levels in dB; Wave Candy has a meter mode per ITU-R BS.1770, but the manual does not mention a LUFS readout |
The Analyzer manual describes the Integrated value only as an average; whether it is calculated with gating as in BS.1770 is not documented. The values are reset by selecting another tab and then LOUDNESS again. For the final check, measuring the exported file is therefore the better choice.
Measurement: how far a limiter without oversampling overshoots its ceiling
A limiter that only limits sample values holds its ceiling for the samples. Peaks between the samples, which are measured as true peak, can sit above it. The Fruity Limiter manual mentions neither true peak nor oversampling. In Maximus, the Oversample option switches on oversampling, with which, according to the manual, the compressor stages also respond to inter-sample peaks. Emphasis has a switch for true-peak limiting per EBU R 128 and oversampling up to 16 times.
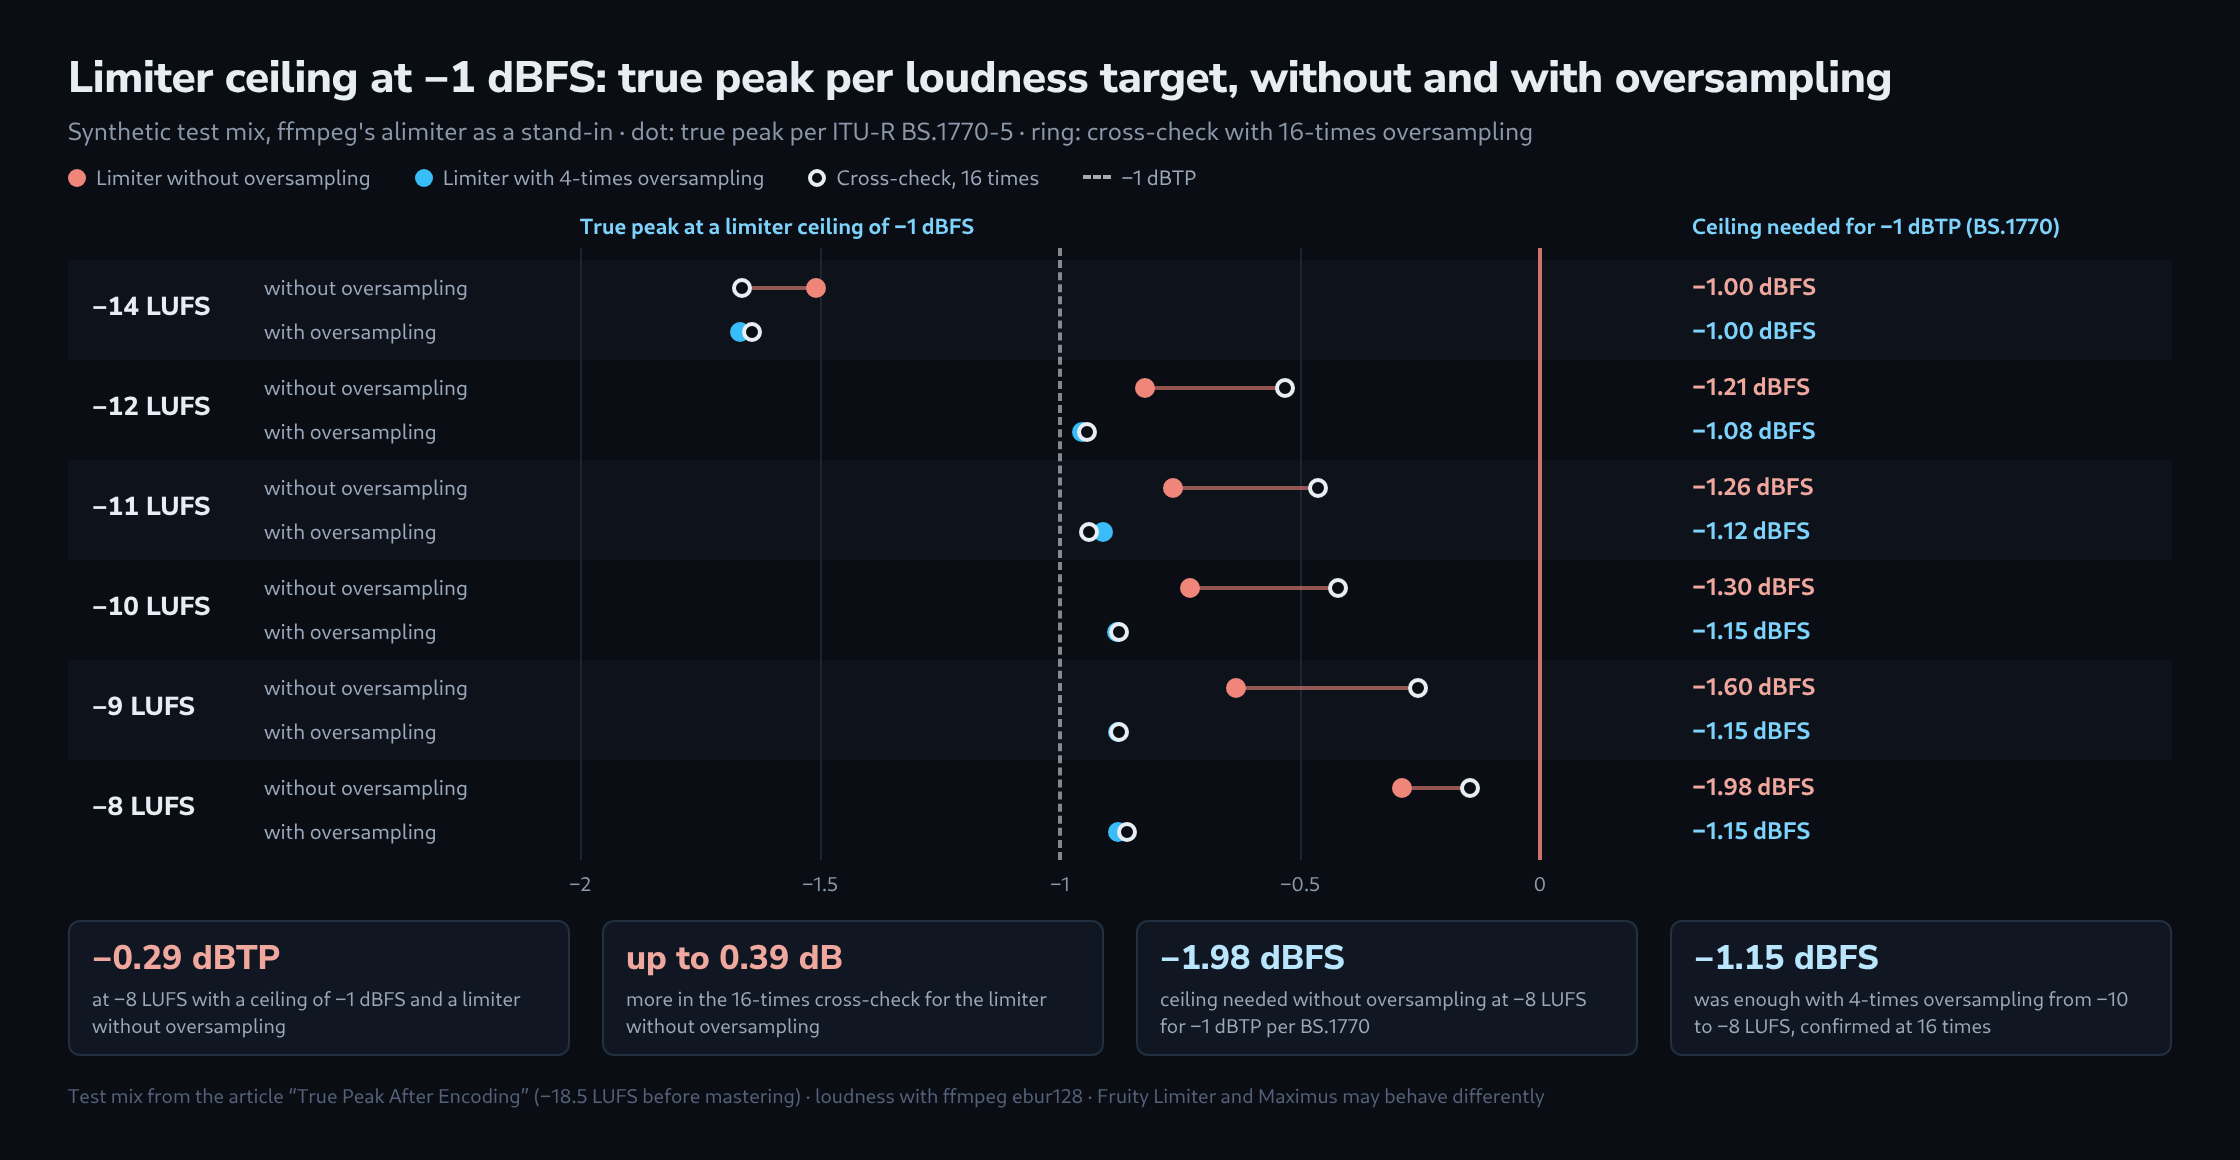
How large the difference can be is shown by a measurement with the synthetic test mix from the true peak article, which sat at −18.5 LUFS before mastering. ffmpeg’s alimiter served as the limiter, once directly at 44.1 kHz and once in a four-times oversampled signal path, as a stand-in for a limiter without and with oversampling. For each loudness target the gain before the limiter was readjusted, and true peak was measured per ITU-R BS.1770-5. Fruity Limiter and Maximus may give different values, but the measurement shows the order of magnitude.
| Target | Without oversampling: true peak at −1 dBFS | Ceiling needed for −1 dBTP | With oversampling: true peak at −1 dBFS | Ceiling needed for −1 dBTP |
|---|---|---|---|---|
| −14 LUFS | −1.51 dBTP | −1.00 dBFS | −1.67 dBTP | −1.00 dBFS |
| −12 LUFS | −0.82 dBTP | −1.21 dBFS | −0.95 dBTP | −1.08 dBFS |
| −11 LUFS | −0.77 dBTP | −1.26 dBFS | −0.91 dBTP | −1.12 dBFS |
| −10 LUFS | −0.73 dBTP | −1.30 dBFS | −0.88 dBTP | −1.15 dBFS |
| −9 LUFS | −0.63 dBTP | −1.60 dBFS | −0.88 dBTP | −1.15 dBFS |
| −8 LUFS | −0.29 dBTP | −1.98 dBFS | −0.88 dBTP | −1.15 dBFS |
At −14 LUFS, a ceiling of −1 dBFS was enough in both cases. From −12 LUFS upwards, the true peak without oversampling sat above −1 dBTP, reaching −0.29 dBTP at −8 LUFS, and the ceiling had to drop as far as −1.98 dBFS. With oversampling, the true peak stayed at −0.88 dBTP or below, and −1.15 dBFS was enough for every target. Without oversampling, the gap between true peak and loudness shrank from 12.5 dB at −14 LUFS to 7.7 dB at −8 LUFS.
A cross-check with 16-times oversampling separates the two cases even more clearly. Without oversampling, the peaks there were up to 0.39 dB higher than per BS.1770: even with the needed ceilings from the table, the masters from −12 to −8 LUFS reached −0.89 to −0.62 dBTP in the cross-check. With oversampling, the two measurements differed by no more than 0.03 dB. EBU Tech 3343 gives a possible under-read of about 0.5 dB for four-times oversampling meters; in this measurement it occurred only with the limiter without oversampling.
Step 1: Setting up the master chain
The chain sits in the effect slots of the master track in the mixer. According to the manual, only the master track and tracks routed directly to an ASIO output can clip; peaks above 0 dB on the other mixer tracks are harmless. The chain in this tutorial, in slot order:
- Fruity Parametric EQ 2 for corrections, for example a high pass with the Steep 4 slope (−24 dB per octave) against rumble, or a low shelf. The LIN switch puts all bands into linear phase and adds latency in return. According to the manual, inter-sample peaks can raise the output peaks in HQ L mode.
- Optionally a compressor or clipper, such as Fruity Multiband Compressor, Fruity Soft Clipper or Emphasizer.
- The limiter as the last effect that changes the level: Fruity Limiter, Maximus or Emphasis.
- After it, FL Studio Mobile Rack with the Analyzer module, so that the meter measures the signal after the limiter.
Step 2: Setting up Fruity Limiter
Fruity Limiter is included in all editions. Inside the plugin, compressor, gain, limiter with noise gate and saturation follow one another; for mastering, the LIMIT tab is what matters.
- CEIL sets the ceiling. For a master around −14 LUFS, −1 dB was enough in the measurement. Louder masters need a lower ceiling with a limiter without oversampling: for −1 dBTP, about −1.3 dB at −10 LUFS and −2 dB at −8 LUFS. For the −2 dBTP that Spotify recommends, a master at −9 LUFS needed a ceiling of −3.0 dB in the same test mix.
- GAIN raises the level before the limiter. It goes up step by step until the Analyzer shows the desired short-term loudness in the loudest passage.
- ATT sets how quickly the limiter responds and at the same time sets the look-ahead delay; at 0 ms there is none. REL sets how the level returns, and CURVE shapes attack and release together.
The SAT control sets the saturation threshold: the further left it is turned, the more the plugin saturates.
Step 2 with Maximus or Emphasis
Maximus is included from Producer Edition upwards and has no threshold knob: the threshold and curve of each band are set by an envelope drawn in the plugin. The Default patch sets all bands to hard limiting. In the Options menu, Oversample switches on oversampling, with which the compressor stages also respond to inter-sample peaks. The 0.2 dB compressor safety option keeps an extra 0.2 dB of headroom. The CEIL control in the saturator is a soft saturation ceiling, not a limiter ceiling; the level after compression is set by the POST gain. The attack time of the MASTER band also sets the look-ahead and therefore the latency.
Emphasis is included only in the All Plugins Edition. There, Output sets the output ceiling in dB, the True Peak switch activates true-peak limiting per EBU R 128 with oversampled peak analysis, and Oversampling ranges from Off to 16x. If the project runs at 192 kHz, the manual says the plugin’s oversampling should stay off.
Step 3: Reading loudness and true peak in the Analyzer
- In the Analyzer module, the LOUDNESS tab shows the loudness measurement.
- The LUFS 3s mode shows short-term loudness, the LUFS 0.4s mode momentary loudness.
- In True Peak mode, the Analyzer also shows the peaks between samples, which according to the manual it determines by interpolation; the Peak value gives the maximum.
- The track plays through once completely before Integrated and Range are read. Target only sets a visual marker.
Step 4: Exporting
- Format: WAV at 24-bit or 32-bit float. According to the manual, 32-bit float is the native format of FL Studio’s mix engine. FL Studio applies dither only when exporting 16-bit WAV and MP3.
- Enable master effects: has to be on for the master track’s chain to end up in the export.
- Resampling: applies to Sampler and audio clip channels. If aliasing is audible, the manual recommends settings above 64-point Sinc for the final render; 512-point Sinc gives the highest quality but takes longest.
- Sample rate: is set in the Audio Settings, not in the export dialog.
Step 5: Measuring the export, encoded as well
The LUFS and True Peak Meter reads the exported WAV file in the browser and measures integrated loudness with gating per BS.1770, true peak and loudness range, without the file leaving the device. Because FL Studio also exports to MP3, OGG and M4A, the same measurement can be repeated with an encoded version, as the meter reads these formats through the browser’s decoder. The streaming services’ encoders work differently from FL Studio’s, but the test still shows the order of magnitude of the remaining headroom.
FL Cloud Mastering as an alternative
Via File › Export › Master (FL Cloud) or Tools › FL Cloud › Mastering, FL Studio offers AI mastering with a loudness target, which needs an internet connection. According to the manual, FL Cloud comes with all editions; without a subscription, the Default preset is available. The FL Cloud Plus and Pro subscriptions add, among other things, genre detection and adjustable parameters such as Loudness, Bass and Brightness. The manual does not state which loudness the presets for the individual platforms aim for or where the true-peak ceiling sits. Measuring the result with the meter answers both.
Sources
- Fruity Limiter – Effect Plugin
- Maximus Controls
- Maximus Tutorials
- Fruity Parametric EQ 2 – Effect Plugin
- FL Studio Mobile Rack
- FL Studio Mobile (Analyzer)
- Emphasis – Effect Plugin
- Emphasizer – Effect Plugin
- Wave Candy – Visual Effect
- Fruity dB Meter – Visual Tool
- Mixer Explained
- Exporting Audio & MIDI
- Menu Bar
- FL Cloud Mastering
- FL Studio 2026.1.6 Latest Release [ 7 Sept 2026 ]
- Loudness normalization – Spotify for Artists
- AES TD1008: Recommendations for Loudness of Internet Audio Streaming and On-Demand Distribution
- EBU Tech 3343: Guidelines for Production of Programmes in accordance with R 128
Related articles