

Raspberry Pi 4 and 5: Booting From an SSD by Changing the Bootloader
Part 1 of 4 in the series Homelab on the Raspberry Pi

The Raspberry Pi 4 and 5 are incredibly powerful single-board computers, capable of running everything from retro gaming consoles to full-fledged home servers. However, they share one notorious Achilles’ heel: the microSD card.
Running an operating system off a standard microSD card is a recipe for disaster in the long run. These cards are designed for sequential data storage (like photos in a camera), not the constant read/write cycles of an OS. A sudden power loss can easily corrupt the file system, resulting in a Raspberry Pi that simply refuses to boot, taking all hosted data with it.
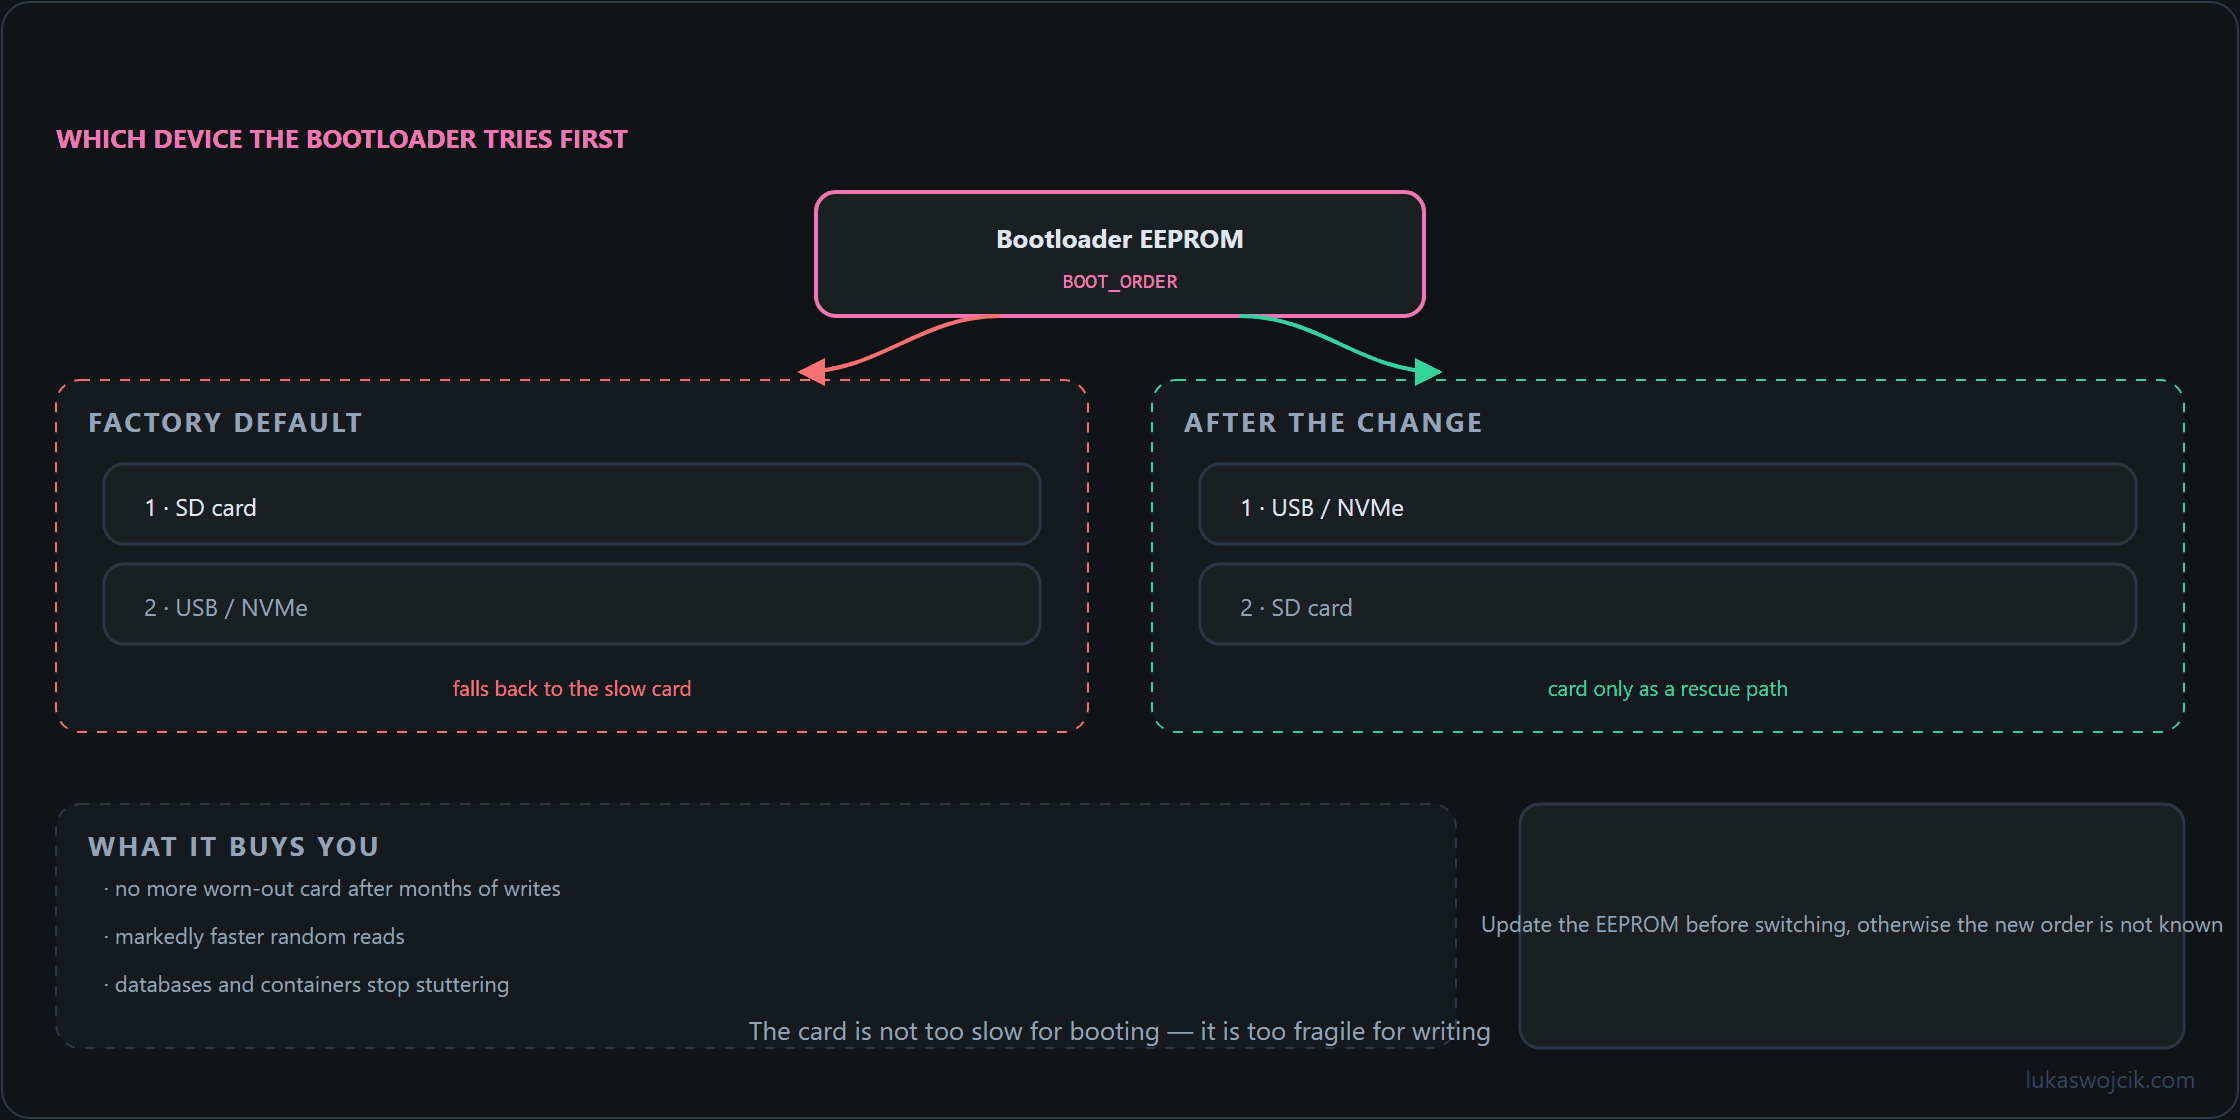
The ultimate solution? Migrating the boot drive to a Solid State Drive (SSD).
The Benefits of SSD Booting
- Unmatched Reliability: SSDs are built with advanced controllers and wear-leveling algorithms. The risk of data corruption after a sudden power outage drops to near zero.
- Massive Speed Boost: An SSD connected via USB 3.0 (or via the PCIe interface on the Pi 5) delivers drastically higher Input/Output Operations Per Second (IOPS). Boot times, application launches, and database queries become lightning-fast.
- Longevity: An SSD will outlive dozens of microSD cards when used as a primary drive for read/write-heavy applications like Home Assistant, Nextcloud, or Docker containers.
Step-by-Step Tutorial: Changing the Bootloader
To make the Raspberry Pi boot from a USB SSD, the internal EEPROM (bootloader) must be updated and reconfigured. Here is the exact procedure.
Step 1: Prepare the Bootloader Update on a microSD Card
- Download and install the Raspberry Pi Imager on a main computer.
- Insert a spare, empty microSD card into that computer.
- Open the Imager. Under Choose Device, select the Raspberry Pi model (4 or 5).
- Under Choose OS, scroll down and select Misc utility images -> Bootloader -> USB Boot. This image writes
BOOT_ORDER=0xf14(USB first, then the SD card) and does not cover NVMe. - For an NVMe drive on the PCIe port of the Pi 5, pick Misc utility images -> Bootloader (Pi 5 family) -> NVMe/USB Boot instead. That image writes
BOOT_ORDER=0xf416, so NVMe (digit 6) is tried first. With adapters that are not HAT+ compliant,PCIE_PROBE=1in the bootloader configuration (rpi-eeprom-config) anddtparam=pciex1in/boot/firmware/config.txtmay be required in addition. The boot order can also be set later viaraspi-configunder Advanced Options -> Boot Order. - Under Choose Storage, select the microSD card and click Next to write the image.
Step 2: Flash the Bootloader to the Pi
- Remove the newly flashed microSD card from the computer and insert it into the powered-off Raspberry Pi.
- Turn on the Raspberry Pi (without any other USB drives attached).
- Wait for about 10–15 seconds. With a monitor connected, the screen turns completely green. Without a monitor, watch the green ACT LED on the Pi—it will start blinking rapidly in a steady pattern. This indicates the bootloader has been successfully updated to prioritize USB boot.
- Power off the Raspberry Pi and remove the microSD card.
Step 3: Flash the OS to the SSD
- Connect the SSD to the main computer (using a USB-to-SATA/NVMe adapter).
- Open the Raspberry Pi Imager again.
- Select the preferred Operating System (e.g., Raspberry Pi OS 64-bit).
- Under Choose Storage, select the connected SSD.
- Click Next and write the OS to the SSD.
Step 4: Boot from the SSD
- Plug the flashed SSD into one of the blue USB 3.0 ports on the Raspberry Pi 4/5 (or the NVMe HAT if using PCIe on the Pi 5).
- The microSD slot may stay empty, but it does not have to be: after the bootloader update the SSD is tried first, so a card left in the slot only acts as a fallback.
- Connect the power supply. Thanks to the new boot order the Raspberry Pi reaches for the SSD first and starts straight from the blazing-fast drive; only if that attempt fails does it fall back to the SD card.
Summary
Moving a Raspberry Pi boot process from a microSD card to an SSD is the most effective way to ensure system reliability and performance. By updating the internal bootloader and migrating the OS to an SSD, the system becomes immune to the common file corruption issues associated with microSD cards, while simultaneously achieving significantly faster boot times and overall responsiveness. This setup is essential for long-term projects like home servers or automation systems that require maximum stability.
Homelab on the Raspberry Pi
- Raspberry Pi 4 and 5: Booting From an SSD by Changing the Bootloader
- Uninterruptible Power Supply (UPS) for Raspberry Pi 4 and 5: Top 5 Solutions for High-Load Setups
- Automated Docker Deployments on the Raspberry Pi: Local-First Dev Environments
- Local CI/CD for Raspberry Pi: Automating Docker Compose Deployments
Related articles


2 comments
Writing the bootloader from an imager card rather than editing configuration files is the part that makes this reproducible — the green screen is a much better confirmation than a log line.
One question before I flash: does that bootloader image replace the whole configuration, or only the boot order? We have a couple of settings in there for power behaviour that I would rather not lose silently.
The whole configuration. The imager writes a complete bootloader release with its own defaults, so anything set previously — power-off behaviour on halt, wake on GPIO, a custom boot order — returns to the values that release ships with.
The safe sequence costs a minute: print the current configuration with
rpi-eeprom-configand keep the output, flash the new bootloader, then re-apply what is missing withrpi-eeprom-config --edit. Comparing the two texts afterwards is also the fastest way to confirm that the boot order really changed to the value the article names.Worth knowing for later: that same command is how the boot order is adjusted without an imager card at all, once a working bootloader is in place. The card route is the reliable way in when the Pi does not boot; the editor is the maintainable way once it does.