

Speed Up a WordPress Site with Lite Page Cache

Contents
For anyone running a WordPress site, speed is everything. A slow-loading website frustrates visitors, hurts search engine rankings, and decreases conversions. While there are dozens of caching plugins available in the WordPress repository, many of them are bloated, complex, and filled with features that may never be needed.
Sometimes all it takes is a simple, plug-and-play solution that does exactly one thing: serve static HTML files to visitors as fast as possible.
That is exactly why we built Lite Page Cache — a lightweight, zero-configuration caching plugin designed specifically for static pages and blog posts.
Here is a look at what makes it special, how to install it, and how to use it to instantly boost a site’s performance.
Why Choose Lite Page Cache?
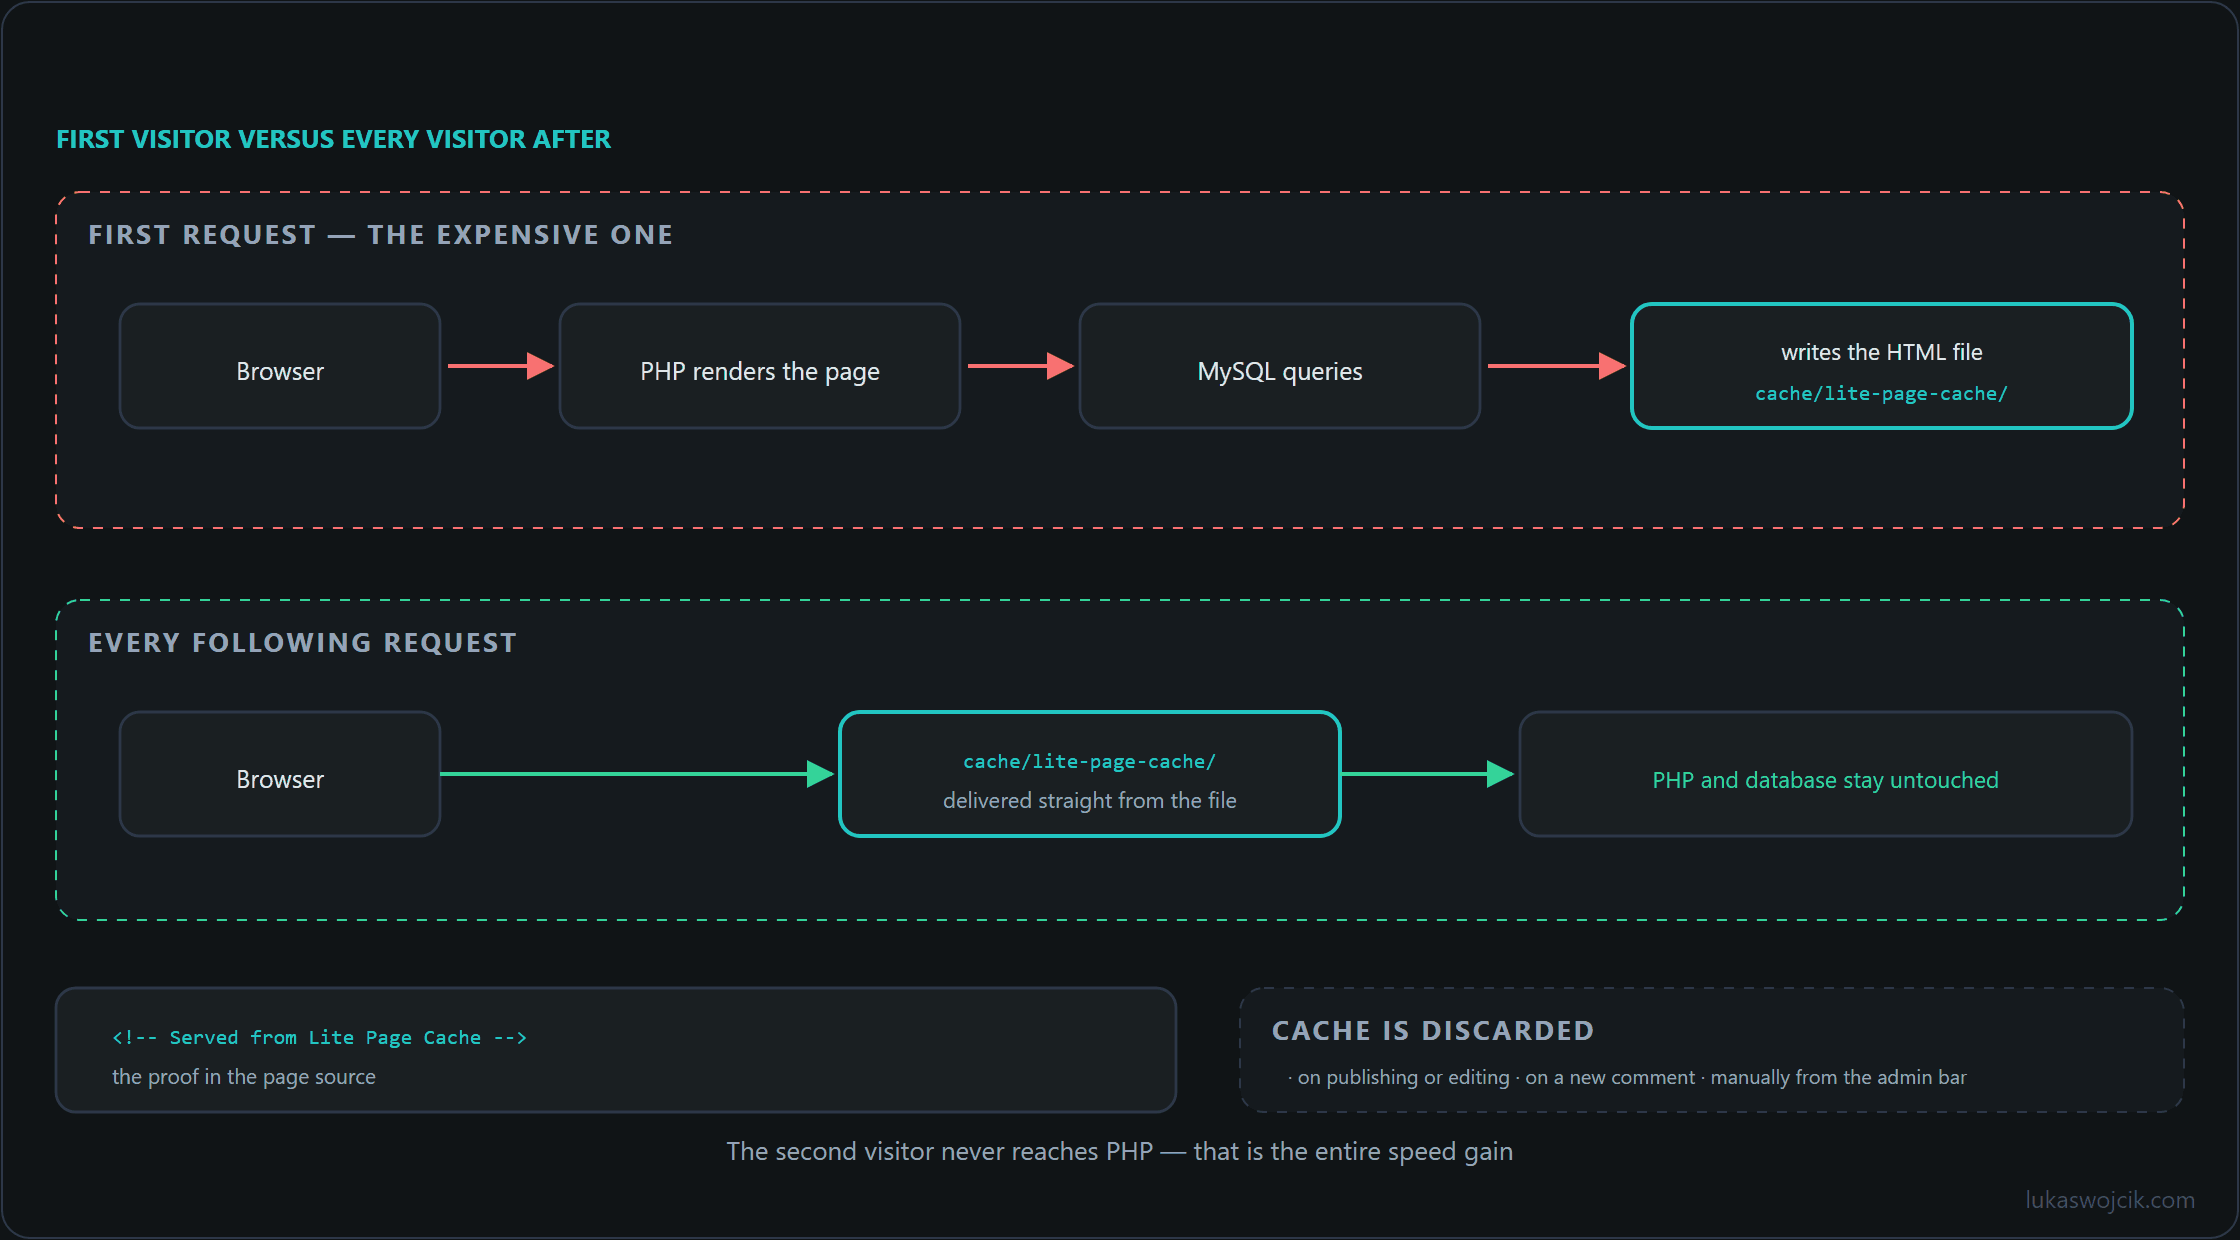
Every time a visitor lands on a WordPress site, the server runs PHP scripts and queries the database to build the page. For a high-traffic site, this quickly drains server resources. Lite Page Cache solves this by capturing the final HTML output of each page and saving it as a static file.
When the next visitor requests that same page, the plugin intercepts the request and instantly serves the static HTML file, bypassing PHP and the database entirely.
Key Features:
- Zero Bloat: Just clean, efficient code that does one job perfectly.
- Smart Bypassing: It automatically skips caching for logged-in users (so the admin bar stays intact) and ignores URLs with tracking parameters (like
?utm_source=). - Auto-Flushing: The cache clears itself automatically whenever a post is published, updated, or deleted.
- Comment-Aware: The cache also flushes automatically the moment a new comment is approved, ensuring visitors always see the latest discussions.
How to Install Lite Page Cache
Since this is a custom, developer-friendly plugin, it is not in the standard WordPress plugin directory. Installation takes just a minute via the site’s file manager or FTP client.
Step-by-Step Installation
- Get Lite Page Cache from Github: https://github.com/LW-IT-Solutions/wp-lite-page-cache
- Access the server files: Open the web host’s File Manager or connect to the site via FTP/SFTP.
- Navigate to the plugins folder: Go to the WordPress installation directory and open
wp-content/plugins/. - Create a new folder: Create a directory named
lite-page-cache. - Upload the plugin files: Inside the new folder, upload the
lite-page-cacher.phpandREADME.mdfiles containing the plugin code. - Activate the plugin: Log in to the WordPress Admin Dashboard, navigate to Plugins > Installed Plugins, locate Lite Page Cache, and click Activate.
Note: The plugin will automatically create a secure cache/lite-page-cache/ folder inside the wp-content directory to store the generated HTML files.
How to Use Lite Page Cache
The best part about Lite Page Cache is that it barely needs to be “used” at all. It is entirely plug-and-play. From the moment it is activated, the plugin starts quietly building static HTML versions of pages and posts as visitors browse the site.
Automatic Cache Management
Outdated content is never a concern. The plugin automatically purges the cache files under the following conditions:
- A new post or page is published.
- An existing post or page is updated.
- A post is deleted.
- A visitor leaves a comment that is instantly approved.
- A pending comment is approved from the moderation queue.
Manual Cache Clearing
There might be times when global changes hit the site – a theme update, a modified sidebar widget, a changed menu. Because these changes affect the layout of all pages, the entire cache needs clearing manually.
To do this:
- In the WordPress Dashboard, go to Settings > Lite Page Cache.
- A simple control panel appears. Click the blue Clear All Cache button.
- A success message will appear at the top of the screen confirming that all cached files have been deleted.
The cache will then seamlessly rebuild itself as visitors navigate the freshly updated site.
Is It Working?
To verify that the plugin is actively speeding up the site, log out of the WordPress admin panel (or open a private/incognito browsing window). Visit any blog post, right-click, and select View Page Source.
Scroll to the very bottom of the HTML code. A hidden comment like this should appear:
<!-- Cached by Lite Page Cache at 2026-07-03 14:30:00 -->
Refreshing the page and checking the source again reveals a second note, confirming it was instantly loaded from the cache:
<!-- Served from Lite Page Cache -->
The result is a newly optimized, blazingly fast WordPress site.
Sources
Related articles



One comment
Running this on a small publishing site since last week,and the two markers at the bottom of the source are what make it easy to explain to non-technical colleagues: the first request writes the file, every one after that is served from it.
One note for anyone testing it, because it cost me twenty minutes: a link opened from a newsletter carries
?utm_source=, and the plugin deliberately bypasses the cache for those URLs. Checking the source through such a link shows no cache marker at all, which looks like a broken installation while the plugin is doing exactly what the description says