English
 Deutsch
 Polski
How to Pass Consent Status to Server-Side GTM
Part 4 of 4 in the series Wiring consent correctly

Contents
Implementing server-side analytics (Server-Side GTM) is a massive step toward data reliability. However, the server environment has one fundamental architectural “flaw”: it has no direct access to the user’s browser, their cookies, or the Consent Management Platform (CMP) banner.
If a user rejects tracking in the Usercentrics banner, the server will not know about it on its own. When data reaches it without a consent status, the Meta Conversions API (CAPI) will dispatch a payload to Facebook, violating GDPR and DMA regulations.
As data architects, we must build a “bridge” that transports the consent decision (Consent State) from the browser (Client GTM) straight to the server container (Server GTM). Here is a technical step-by-step guide on how to do this using Usercentrics, Meta Pixel, and Meta CAPI.
1. The Logic: How Does This “Bridge” Work?
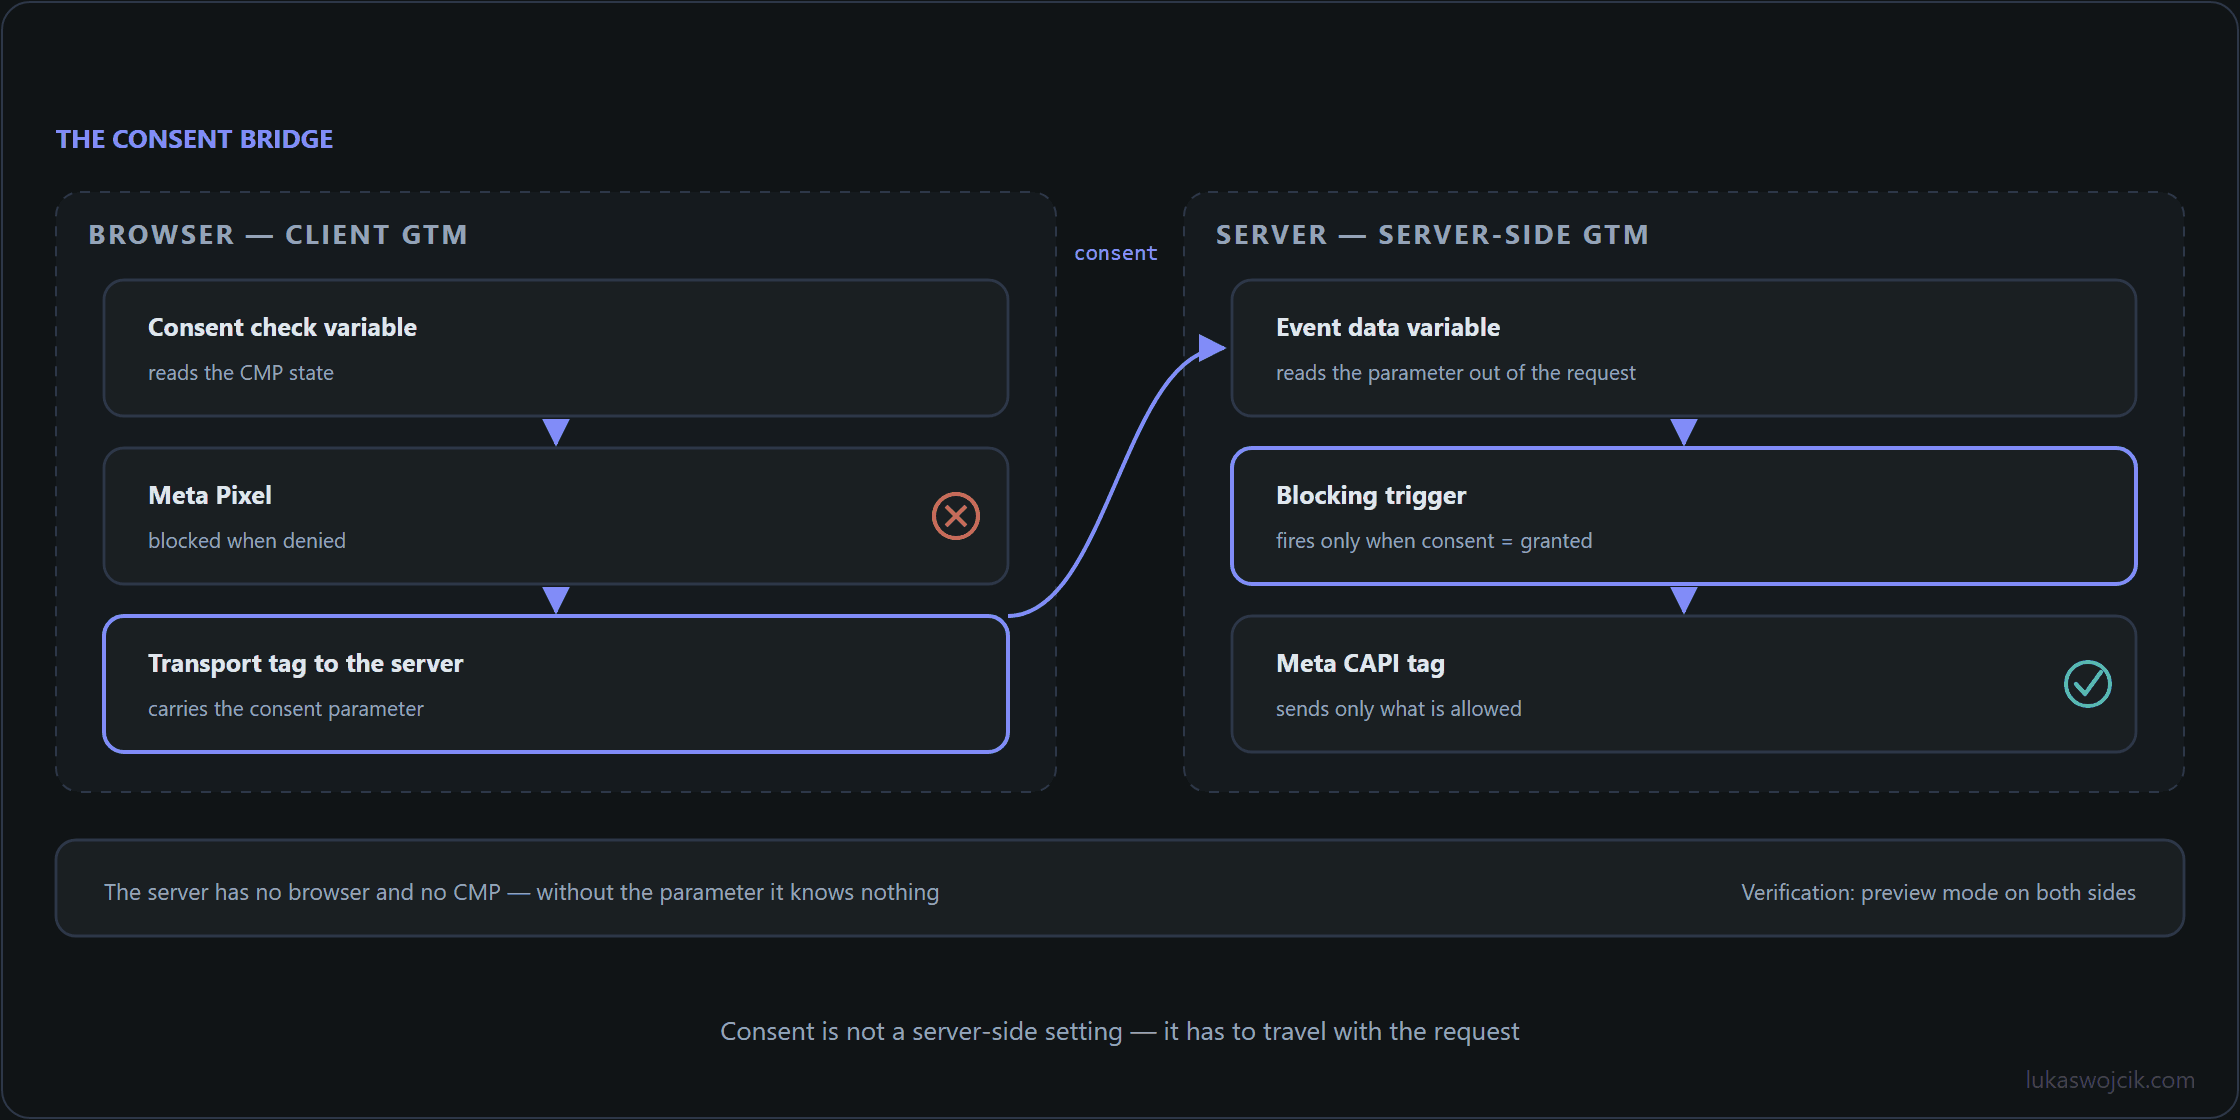
Instead of relying solely on the built-in Google Consent Mode (which can sometimes be tricky to debug on the server side with non-Google tags), we will use the most reliable method: explicitly passing the user’s decision as an Event Parameter in the transport tag (e.g., GA4).
- Consent: Usercentrics saves the user’s choice.
- Client GTM: We block the classic Meta Pixel if consent is missing. Then, we capture the consent status and append it as a parameter to the tag sending data to our server (ssGTM).
- Server GTM: We receive the parameter as Event Data. We build a Trigger that executes Meta CAPI only if the consent parameter equals
true.
2. Client GTM Configuration (Browser)
We start with the browser container. The assumption here is a Usercentrics CMP tag that is already implemented and pushes events to the DataLayer.
Step A: The Consent Check Variable
Usercentrics natively has its own variables or allows checking the status of a given Data Processing Service.
- Create a Variable of the Data Layer Variable type.
- Enter the key name under which Usercentrics stores the consent for Meta. (If using the official Usercentrics template, this is often provided via custom JS checking the
Usercentricsobject). For this guide, let’s name this variable{{UC - Meta Consent}}. This variable must returntrueorfalse.
Step B: Securing the Meta Pixel (Client-Side)
The browser-based Meta Pixel must respect the user’s decision.
- Open the Meta Pixel tag.
- Go to the Triggering section.
- Create a new Trigger of the Custom Event type.
- Set the event name to
consent_status(or whichever event fires pageviews after Usercentrics loads). - Select “Some Custom Events” and add the condition:
{{UC - Meta Consent}}equalstrue. - (Optional) With Google Consent Mode v2, the tag’s Advanced Settings > Consent Settings can additionally require
ad_storageandad_user_data.
Step C: Passing Consent to the Server (Transport Tag)
Data is usually sent to ssGTM via a GA4 tag. We need to “attach” our consent to this request.
- Open the main transport tag (e.g., Google Tag or GA4 Configuration/Event) that has routing set to the server URL (e.g.,
sgtm.yourdomain.com). - Go to the Event Parameters section.
- Add a new parameter. Name it
meta_consent_state. - Assign our variable as the value:
{{UC - Meta Consent}}. - Save and publish the Client GTM. From now on, every request flying to the server carries a flag indicating whether the user allowed Meta tracking.
3. Server-Side GTM Configuration (Server)
We move to the server container. Here we need to receive the transmitted parameter and use it to block the Meta CAPI tag.
Step A: Receiving the Parameter (Event Data Variable)
- In the ssGTM container, go to the Variables tab.
- Create a new Variable of the Event Data type.
- In the Key Path field, enter exactly the same name sent from Client GTM:
meta_consent_state. - Save the variable as
{{EventData - Meta Consent}}.
Step B: Building the Blocking Trigger for Meta CAPI
We don’t want the Meta CAPI tag firing every time. It must be strictly controlled by our variable.
- Go to the Triggers tab.
- Create a new Trigger of the Custom Event type.
- For the event name, enter
.*and check Use regex matching (to fire this for every e-commerce event) OR enter a specific event likepage_view. - Check the option to fire on Some Custom Events.
- Add the absolute condition:
{{EventData - Meta Consent}}equalstrue. - To additionally require a specific client, add the condition:
Client NameequalsGA4. - Save the Trigger as
Trigger - Meta CAPI - Consent Granted.
Step C: Attaching the Trigger to the Meta CAPI Tag
- Open the Meta Conversions API tag in ssGTM.
- In the Triggering section, remove the default trigger (e.g., “All Events”).
- Add the newly created trigger:
Trigger - Meta CAPI - Consent Granted. - Save the tag and run Preview mode to test the implementation.
4. Verifying the Implementation
To be 100% sure nothing here breaks the law, perform this test:
- Visit the site in Incognito mode. In the Usercentrics banner, reject all consents.
- Check the Client GTM Debugger to see if the Meta Pixel was prevented from firing (the Trigger should show a red cross next to the
{{UC - Meta Consent}} == truecondition). - Inspect the request sent to ssGTM. In the Event Data preview in Server GTM, the
meta_consent_stateparameter should carry the valuefalse. - The Meta CAPI tag on the server should not fire. The environment is then secure and fully legal.
Summary
Passing the consent status between the browser and the server is the foundation of modern data engineering. Explicitly defining the meta_consent_state parameter in the transport tag delivers full control and transparency over what goes to external vendors and when. It guarantees an architecture that is not only technically flawless but also fully compliant with Usercentrics privacy policies, GDPR, and DMA regulations.
Questions and answers
On the server, does a missing meta_consent_state mean something different from an explicit false?
They mean different things upstream and the same thing downstream, and keeping those two apart is worth the effort.
The trigger condition is equals true, so an absent value and an explicit false both fail it. That is the correct behavior and the reason the setup is safe by default: whatever the browser failed to tell the server results in no CAPI call. Upstream, though, the two have different causes. An explicit false means the CMP answered and the answer was no. An absent parameter means the transport tag fired without the variable resolving, usually because the tag ran before the CMP had written its state, or because the data layer key changed name.
The second case is the one that quietly costs conversions, because those hits carry no consent even for users who accepted a moment later: the request has already left. So the value of separating them is diagnostic. A count of hits per state on the server (true, false, absent) turns an invisible ordering problem into a number, and a rising share of absent values is the signal that the tag is firing ahead of the banner.
Wiring consent correctly
- How to Implement Google Consent Mode v2
- How Cookieless Pings Work in Google Consent Mode
- GA4 Consent Mode v2: The gcd Parameter, CMP Race Conditions and Server-Side Debugging
- How to Pass Consent Status to Server-Side GTM
Related articles